As the digital transformation of businesses and personal transactions continues to accelerate, electronic signatures (e-signatures) have become an essential tool. They offer a convenient, secure, and efficient way to sign documents without the need for physical presence. However, one critical aspect of using e-signatures is understanding their validity. This article explores the legal standing, security, and best practices for ensuring the validity of electronic signatures.
What Are Electronic Signatures?
Electronic signatures are digital representations of a person’s intent to agree to or approve the contents of a document. They can take various forms, such as a typed name, an image of a handwritten signature, a digital certificate, or even a click of an “I agree” button. E-signatures are used across various industries for contracts, agreements, consent forms, and more.
Legal Validity of Electronic Signatures
The legal validity of electronic signatures varies by jurisdiction, but many countries have enacted laws and regulations that give e-signatures the same legal standing as handwritten signatures. Key pieces of legislation include:
1. United States: The ESIGN Act and UETA
ESIGN Act (Electronic Signatures in Global and National Commerce Act): Enacted in 2000, the ESIGN Act gives electronic signatures the same legal effect as handwritten signatures for most transactions in interstate and foreign commerce.
UETA (Uniform Electronic Transactions Act): Adopted by most U.S. states, UETA provides a framework for electronic transactions, ensuring that e-signatures are legally recognized at the state level.
2. European Union: eIDAS Regulation
eIDAS (Electronic Identification, Authentication and Trust Services): Effective since 2016, the eIDAS Regulation provides a standardized legal framework for electronic identification and trust services across the EU. It recognizes three types of electronic signatures: Simple Electronic Signatures (SES), Advanced Electronic Signatures (AES), and Qualified Electronic Signatures (QES), with QES having the highest legal standing.
3. Other Jurisdictions
Many other countries have their own laws and regulations governing electronic signatures, often aligning with international standards. Examples include:
Canada: PIPEDA (Personal Information Protection and Electronic Documents Act)
Australia: Electronic Transactions Act
India: Information Technology Act
Ensuring the Validity of Electronic Signatures
To ensure the validity of an electronic signature, consider the following factors:
1. Intent to Sign
The signer must demonstrate a clear intention to sign the document electronically. This can be shown through the act of clicking a button, typing a name, or using a digital certificate.
2. Consent to Do Business Electronically
Both parties must consent to conduct the transaction electronically. This is often accomplished through a prior agreement or during the signing process.
3. Association of Signature with the Document
The electronic signature must be logically associated with the document. This means the signature should be linked to the content of the document in a way that any changes to the document would invalidate the signature.
4. Attribution of the Signature
The signature must be attributable to the signer. This can be done through authentication methods such as email verification, two-factor authentication, digital certificates, or biometric data.
5. Retention of Records
The signed document and the associated electronic signature must be retained in a form that is accessible for future reference. This includes maintaining audit trails and logs of the signing process.
Security Measures for Valid Electronic Signatures
Security is paramount in ensuring the validity of electronic signatures. Here are some key security measures:
1. Encryption
Encryption protects the integrity of the signed document and the signature by making it unreadable to unauthorized parties.
2. Digital Certificates
Digital certificates, issued by trusted Certificate Authorities (CAs), verify the identity of the signer and provide a higher level of security. They are often used in creating Advanced and Qualified Electronic Signatures.
3. Audit Trails
Audit trails record every action taken during the signing process, providing a detailed log that can be used to verify the authenticity and integrity of the signature.
4. Authentication
Strong authentication methods, such as multi-factor authentication (MFA), help ensure that the signer is who they claim to be. This reduces the risk of unauthorized signing.
Best Practices for Using Electronic Signatures
To maximize the legal validity and security of electronic signatures, follow these best practices:
Choose a Reputable E-Signature Provider: Use trusted e-signature platforms like DocuSign, Adobe Sign, or SignNow that comply with relevant laws and standards.
Understand Legal Requirements: Familiarize yourself with the legal requirements for electronic signatures in your jurisdiction and industry.
Implement Strong Authentication: Use multi-factor authentication to verify the identity of signers.
Maintain Detailed Records: Keep comprehensive records of the signing process, including audit trails, to provide evidence of the signature’s validity.
Regularly Update Security Practices: Stay informed about the latest security threats and best practices to protect your electronic signature processes.
FAQs
1. Are electronic signatures legally binding? Yes, electronic signatures are legally binding in many jurisdictions, provided they meet the legal requirements set forth by relevant laws and regulations.
2. How can I ensure the security of my electronic signature? Ensure the security of your electronic signature by using strong encryption, digital certificates, secure e-signature platforms, and robust authentication methods.
3. Can electronic signatures be used for all types of documents? While electronic signatures can be used for most documents, some specific types of documents (e.g., wills, certain real estate transactions) may require handwritten signatures by law. Always check the legal requirements for your specific use case.
4. What is the difference between an Advanced Electronic Signature (AES) and a Qualified Electronic Signature (QES)? An AES is an electronic signature that provides a higher level of security and is uniquely linked to the signer. A QES meets the highest legal and security standards and is based on a qualified certificate issued by a trusted Certificate Authority.
5. How do I verify an electronic signature? Verify an electronic signature by checking the digital certificate, reviewing the audit trail, and ensuring the signature is logically associated with the document.
Conclusion
The validity of electronic signatures is well-established in many parts of the world, thanks to comprehensive legal frameworks and advancements in technology. By understanding the requirements and implementing best practices, individuals and businesses can confidently use electronic signatures to streamline their workflows, enhance security, and ensure legal compliance. Whether you’re signing a simple agreement or a complex contract, electronic signatures offer a reliable and efficient solution for modern transactions.
Contract management software has become an indispensable tool for businesses seeking to streamline their contract lifecycle management processes. This software not only simplifies the creation, execution, and monitoring of contracts but also ensures compliance, reduces risks, and enhances efficiency. This article explores the various capabilities of contract management software and how it can benefit your organization.
Key Capabilities of Contract Management Software
Centralized Repository
Secure Storage: All contracts are stored in a single, secure location, ensuring easy access and reducing the risk of lost or misplaced documents.
Search and Retrieval: Advanced search capabilities allow users to quickly find specific contracts or clauses.
Automated Workflows
Contract Creation: Templates and pre-approved clauses streamline the creation of contracts, ensuring consistency and compliance.
Approval Processes: Automated workflows route contracts to the appropriate stakeholders for review and approval, reducing delays and ensuring that all necessary approvals are obtained.
Compliance and Risk Management
Regulatory Compliance: The software ensures that contracts comply with relevant laws and regulations, reducing the risk of legal issues.
Audit Trails: Detailed logs of all contract activities provide transparency and accountability, making it easier to audit and track changes.
Contract Monitoring and Alerts
Deadline Management: Automated alerts and notifications for key dates, such as renewal deadlines and expiration dates, help avoid missed opportunities or unwanted renewals.
Performance Tracking: The software can track contract performance against defined KPIs, ensuring that obligations are met and identifying areas for improvement.
Collaboration Tools
Version Control: Multiple stakeholders can collaborate on contract drafts, with version control ensuring that changes are tracked and managed effectively.
Real-Time Editing: Real-time editing and commenting features facilitate seamless collaboration and communication among team members.
Integration Capabilities
ERP and CRM Integration: Contract management software can integrate with enterprise resource planning (ERP) and customer relationship management (CRM) systems, ensuring that contract data is consistent across all business systems.
E-Signature Integration: Integration with e-signature solutions like DocuSign or Adobe Sign enables the efficient and secure signing of contracts.
Benefits of Contract Management Software
Enhanced Efficiency
Time Savings: Automation of routine tasks and streamlined workflows significantly reduce the time required to create, review, and approve contracts.
Reduced Errors: Automated templates and clause libraries minimize the risk of errors and inconsistencies.
Improved Compliance and Reduced Risk
Regulatory Adherence: Ensures that contracts comply with industry standards and regulations, reducing the risk of legal penalties.
Risk Mitigation: Proactive monitoring and alerts help identify and mitigate potential risks before they become issues.
Cost Savings
Reduced Administrative Costs: Automation and centralized storage reduce the need for manual processes and physical storage, leading to cost savings.
Avoidance of Penalties: Timely alerts and compliance tracking help avoid penalties related to missed deadlines or non-compliance.
Better Decision Making
Data-Driven Insights: Analytics and reporting tools provide valuable insights into contract performance and trends, enabling better decision-making.
Visibility and Transparency: Centralized storage and detailed audit trails provide complete visibility into contract status and history.
Enhanced Collaboration
Improved Communication: Real-time editing and collaboration tools enhance communication among stakeholders, leading to faster and more effective contract negotiations.
Stakeholder Alignment: Automated workflows and approval processes ensure that all stakeholders are aligned and informed throughout the contract lifecycle.
FAQs
1. What is contract management software? Contract management software is a digital tool designed to streamline and automate the creation, execution, monitoring, and management of contracts throughout their lifecycle.
2. How does contract management software improve compliance? The software ensures that contracts adhere to relevant laws and regulations by providing templates, pre-approved clauses, and automated compliance checks. It also maintains detailed audit trails for transparency and accountability.
3. Can contract management software integrate with other business systems? Yes, most contract management software solutions offer integration capabilities with ERP, CRM, e-signature platforms, and other business systems, ensuring seamless data flow and consistency.
4. How does the software help in managing contract deadlines? Contract management software provides automated alerts and notifications for key dates such as renewals, expirations, and milestones, helping users manage deadlines effectively and avoid missed opportunities.
5. Is contract management software suitable for all types of contracts? Yes, contract management software is versatile and can be used for various types of contracts, including sales agreements, procurement contracts, employment agreements, and more.
Conclusion
Contract management software is a powerful tool that can transform the way businesses handle their contracts. By automating workflows, ensuring compliance, reducing risks, and enhancing efficiency, this software provides significant benefits that can lead to cost savings and better decision-making. Whether you are a small business or a large enterprise, investing in contract management software can help you streamline your processes and achieve greater operational excellence.
Adding electronic signatures to your documents on a Mac is a seamless process, thanks to built-in tools and various third-party applications. This guide will walk you through the steps to create and use electronic signatures on your Mac, whether working with PDFs, Word documents, or other file types. We’ll also cover best practices to ensure your signatures are secure and legally compliant.
Why Use Electronic Signatures on a Mac?
1. Convenience
Electronic signatures save time and eliminate the need for printing, signing, and scanning documents.
2. Security
Digital signatures provide secure authentication and help prevent document tampering.
3. Legality
Electronic signatures are legally binding in many jurisdictions, provided they meet certain criteria.
4. Environmental Impact
Using electronic signatures reduces paper consumption, contributing to environmental sustainability.
Creating an Electronic Signature on Mac
Using Preview (Built-in Tool)
Preview is a versatile application that comes pre-installed on all Mac computers. It allows you to create and add electronic signatures to your PDFs and images.
Step-by-Step Guide:
Open the Document in Preview: Double-click your PDF file to open it in Preview.
Open the Markup Toolbar: Click the “Show Markup Toolbar” button (a pen icon) to reveal the toolbar.
Create a Signature:
Click the “Sign” button in the Markup Toolbar.
Choose “Create Signature” and select your input method: trackpad, camera, or iPhone/iPad.
Trackpad:
Use your trackpad to draw your signature. Press any key when you’re finished.
Camera:
Write your signature on a piece of white paper.
Hold the paper up to your camera and allow Preview to capture the signature.
iPhone/iPad:
If you have an iPhone or iPad connected to your Mac, you can use it to create a signature. Follow the on-screen instructions.
Add the Signature to the Document:
Click on the “Sign” button again and select your saved signature.
Drag and drop the signature to the desired location in the document.
Resize as necessary.
Using Third-Party Applications
Several third-party applications offer advanced features for creating and managing electronic signatures on a Mac.
1. Adobe Acrobat Reader DC
Adobe Acrobat Reader DC is a popular tool for working with PDFs and offers robust e-signature capabilities.
Open the Document: Open your PDF in Adobe Acrobat Reader DC.
Sign the Document: Click on the “Fill & Sign” tool in the right-hand pane.
Add Signature: Select “Sign yourself,” then choose “Add Signature.”
Create Signature: Type, draw, or upload your signature.
Place Signature: Click to place the signature in the document.
2. DocuSign
DocuSign is a leading e-signature platform that integrates well with various document types and offers comprehensive security features.
Upload Document: Upload your document to DocuSign.
Add Recipients: Enter the email addresses of the signers.
Place Signature Fields: Drag and drop signature fields onto the document.
Sign and Send: Sign the document and send it to other recipients for signing.
3. SignNow
SignNow is another excellent option for creating and managing electronic signatures on a Mac.
Open SignNow: Download and open the SignNow app on your Mac.
Upload Document: Upload your document.
Create and Place Signature: Use the tools to create and place your signature.
Save and Share: Save the signed document and share it with relevant parties.
Best Practices for Using Electronic Signatures on a Mac
1. Verify Signer’s Identity
Ensure the identity of the signer is verified to maintain the integrity of the signature.
2. Secure Storage
Store signed documents securely to prevent unauthorized access or tampering.
3. Legal Compliance
Ensure that your use of electronic signatures complies with relevant laws and regulations in your jurisdiction.
4. Audit Trails
Use tools that provide audit trails to track the signing process and provide proof of signature.
5. Backup Copies
Keep backup copies of signed documents to safeguard against data loss.
FAQ Section
1. Can I use Preview to sign any document type?
Preview is primarily used for PDFs and images. For other document types like Word or Excel, consider using third-party applications such as Adobe Acrobat or DocuSign.
2. Are electronic signatures created in Preview legally binding?
Yes, electronic signatures created in Preview can be legally binding, provided they meet the necessary legal criteria.
3. Which third-party applications are best for electronic signatures on a Mac?
Adobe Acrobat Reader DC, DocuSign, and SignNow are highly recommended for their robust features and security.
4. Can I use my iPhone to create a signature for use on my Mac?
Yes, you can use your iPhone to create a signature and then import it to your Mac using tools like Preview or third-party apps.
5. How do I ensure my signed documents are secure?
Use password protection, and secure storage solutions, and choose reputable e-signature tools that offer strong encryption and authentication measures.
By leveraging the capabilities of your Mac and using reliable tools, you can efficiently add electronic signatures to your documents, ensuring they are secure, professional, and legally compliant.
Conclusion
Adding electronic signatures to your documents on a Mac is a straightforward process with both built-in tools like Preview and advanced third-party applications like Adobe Acrobat Reader DC, DocuSign, and SignNow. By following the steps and best practices outlined in this guide, you can ensure that your electronic signatures are secure, legally binding, and professionally implemented.
Microsoft Excel is a powerful tool widely used for data analysis, financial modeling, and reporting. Adding an electronic signature to your Excel documents can enhance their credibility and ensure they are legally binding. This guide will walk you through the process of adding an electronic signature in Excel, along with tips and best practices to ensure security and compliance.
Why Use Electronic Signatures in Excel?
1. Legal Validity
Electronic signatures are legally binding and recognized in many jurisdictions, making your signed Excel documents valid for official and legal purposes.
2. Efficiency
Adding an electronic signature eliminates the need to print, sign, and scan documents, saving time and resources.
3. Security
Electronic signatures often include authentication measures, ensuring that the signer’s identity is verified and the document’s integrity is maintained.
4. Professionalism
Signed documents appear more professional and credible, especially in business and financial contexts.
How to Add an Electronic Signature in Excel
Step 1: Prepare Your Excel Document
Open Your Document: Open the Excel file where you want to add the electronic signature.
Save a Copy: Save a copy of the document to ensure you have a backup before making any changes.
Step 2: Insert a Signature Line
Navigate to the Ribbon: Click on the “Insert” tab in the Excel ribbon.
Signature Line Option: In the “Text” group, click on “Signature Line” to open the Signature Setup dialog box.
Fill in Details: Enter the signer’s name, title, and any instructions for signing. Click “OK” to insert the signature line into your document.
Step 3: Sign the Document
Right-click the Signature Line: Right-click on the signature line you inserted and select “Sign.”
Select Signing Method: In the “Sign” dialog box, you can either type your name, draw your signature using a mouse or touchscreen, or upload an image of your handwritten signature.
Add Signature: Complete the signing process by following the on-screen instructions. Your electronic signature will be added to the document.
Step 4: Secure and Save the Document
Save the Signed Document: Save the document after adding your signature. It’s a good practice to save it as a read-only file to prevent further edits.
Protect the Workbook: Consider protecting the workbook with a password to enhance security. Go to “File” > “Info” > “Protect Workbook” > “Encrypt with Password” and set a password.
Using Third-Party Tools for Advanced Signatures
While Excel’s built-in signature feature is useful, you might need more advanced options for higher security and compliance. Third-party e-signature tools can offer enhanced features:
1. Adobe Sign
Adobe Sign integrates seamlessly with Microsoft Office applications, including Excel. It provides robust security features and compliance with various legal standards.
2. DocuSign
DocuSign is another popular e-signature solution that can be used with Excel documents. It offers advanced authentication, audit trails, and integration with other business tools.
3. SignNow
SignNow provides a straightforward way to add electronic signatures to Excel documents. It includes features like bulk sending, template creation, and secure storage.
Best Practices for Using Electronic Signatures in Excel
1. Verify Signer’s Identity
Use authentication tools to verify the signer’s identity and ensure the signature’s validity.
2. Maintain Document Integrity
Save signed documents as read-only or password-protected files to prevent unauthorized changes.
3. Keep Records
Maintain records of signed documents, including the date and time of signing, for future reference and legal compliance.
4. Understand Legal Requirements
Ensure that electronic signatures comply with local laws and regulations, especially for documents requiring high security and legal validity.
Conclusion
Adding Electronic signatures (e-signatures) has revolutionized how documents are signed, providing convenience and efficiency. However, for certain legal documents, notarization is required to verify the identity of the signers and ensure the authenticity of the signatures. This guide will explain how to notarize an electronic signature, the benefits of doing so, and the best practices for ensuring legal compliance.
In the realm of electronic signatures and document management, SignNow, and PandaDoc stand out as two of the most prominent solutions. Both platforms offer robust features tailored to streamline the document signing process, enhance productivity, and ensure legal compliance. This article provides an in-depth comparison of SignNow and PandaDoc, highlighting their key features, pricing, pros and cons, and ideal use cases to help you determine which solution best suits your needs.
Overview of SignNow and PandaDoc
SignNow SignNow is a user-friendly electronic signature solution designed to simplify the signing and management of documents. It offers a variety of features including document templates, in-person signing, advanced security options, and integrations with popular business tools. SignNow is known for its affordability and ease of use, making it a popular choice for small to medium-sized businesses.
PandaDoc PandaDoc is an all-in-one document automation software that goes beyond electronic signatures. It provides comprehensive tools for creating, sending, tracking, and signing documents. PandaDoc’s features include document templates, a drag-and-drop editor, analytics, payment collection, and CRM integrations. It is ideal for sales teams and businesses looking to streamline their document workflows.
Key Features Comparison
1. Document Creation and Templates
SignNow
Offers a variety of customizable templates to speed up document creation.
Users can create and save templates for frequently used documents.
Simple drag-and-drop interface for adding signature fields, text, and dates.
PandaDoc
Advanced document creation with a robust drag-and-drop editor.
Extensive template library for various industries and use cases.
Integration with CRM systems to pull data directly into documents.
2. Electronic Signatures
SignNow
Supports electronic signatures, in-person signing, and mobile signatures.
Compliance with major e-signature laws (e.g., ESIGN Act, UETA, eIDAS).
Provides audit trails and secure storage for signed documents.
PandaDoc
Comprehensive e-signature functionality with legally binding signatures.
Real-time notifications and tracking for document status.
Advanced authentication options including SMS verification.
3. Document Management
SignNow
Centralized document storage with secure access controls.
Version control and document history tracking.
Integration with cloud storage services like Google Drive, Dropbox, and OneDrive.
PandaDoc
Robust document management features including content libraries and smart folders.
Collaboration tools for team editing and comments.
Document analytics to track views, time spent, and interactions.
4. Integrations
SignNow
Integrates with popular business tools such as Salesforce, Microsoft 365, Google Workspace, and more.
API access for custom integrations and automation.
PandaDoc
Extensive integrations with CRM systems like HubSpot, Salesforce, Pipedrive, and more.
Connects with payment gateways (Stripe, PayPal) for collecting payments within documents.
API access for custom workflows and integrations.
Pricing
SignNow
Offers a range of pricing plans suitable for different business sizes:
Business: $8 per user/month (billed annually).
Business Premium: $15 per user/month (billed annually).
Enterprise: Custom pricing based on specific needs.
PandaDoc
Provides several pricing tiers to cater to various business requirements:
Essentials: $19 per user/month (billed annually).
Business: $49 per user/month (billed annually).
Enterprise: Custom pricing based on business needs and size.
Pros and Cons
SignNow
Pros
Affordable pricing plans.
User-friendly interface with easy setup.
Strong security features and compliance with e-signature laws.
Robust mobile app for signing on the go.
Cons
Limited advanced document creation features compared to PandaDoc.
Basic analytics and reporting capabilities.
PandaDoc
Pros
Comprehensive document automation features.
Advanced document creation and customization tools.
Integrations with CRM systems and payment gateways.
Detailed document analytics and tracking.
Cons
Higher pricing, especially for advanced features.
Learning curve for users new to document automation software.
Ideal Use Cases
SignNow
Small to medium-sized businesses looking for an affordable and straightforward e-signature solution.
Organizations need a reliable mobile app for signing documents on the go.
Businesses requiring basic document management and integration with common business tools.
PandaDoc
Sales teams and businesses focused on streamlining their document workflows and automating the sales process.
Organizations that need advanced document creation, customization, and analytics.
Companies seeking seamless integration with CRM systems and payment collection within documents.
FAQs
1. Which platform is more cost-effective for small businesses? SignNow is generally more cost-effective for small businesses due to its lower pricing plans and essential e-signature features.
2. Can PandaDoc handle complex document workflows? Yes, PandaDoc is designed to handle complex document workflows with its advanced document automation features and integrations with various business tools.
3. Are electronic signatures on these platforms legally binding? Yes, both SignNow and PandaDoc provide legally binding electronic signatures that comply with major e-signature laws and regulations.
4. Can I use these platforms on mobile devices? Yes, both SignNow and PandaDoc offer mobile apps that allow users to sign and manage documents on the go.
5. Which platform offers better integration with CRM systems? PandaDoc offers more extensive integration options with CRM systems, making it ideal for sales teams and businesses that rely heavily on CRM software.
Conclusion
Both SignNow and PandaDoc offer robust solutions for electronic signatures and document management, but they cater to different needs. SignNow is an excellent choice for small to medium-sized businesses seeking an affordable, user-friendly e-signature solution. PandaDoc, on the other hand, is ideal for organizations that require advanced document automation, extensive customization options, and seamless CRM integration.
By understanding the strengths and weaknesses of each platform, you can make an informed decision that aligns with your business requirements and enhances your document management processes.
In today’s digital world, electronic signatures (e-signatures) have become a standard method for signing documents. They offer convenience, speed, and security compared to traditional paper-based signatures. However, understanding what constitutes an acceptable electronic signature is crucial for ensuring legality and compliance. This guide will explore the types of acceptable electronic signatures, their legal standing, and best practices for using them.
What is an Electronic Signature?
An electronic signature is a digital indication of a person’s intent to agree to or approve the contents of a document. E-signatures can take various forms, including:
Typed Names: A simple typed name at the end of an email or document.
Click-to-Sign: Clicking a button or checkbox to agree to terms or sign a document.
Digital Signatures: A more secure form of electronic signature that uses encryption and digital certificates to verify the signer’s identity.
Scanned Signatures: A handwritten signature scanned and inserted into a digital document.
Legal Standing of Electronic Signatures
1. United States (ESIGN Act and UETA)
In the United States, the Electronic Signatures in Global and National Commerce Act (ESIGN Act) and the Uniform Electronic Transactions Act (UETA) establish the legality of electronic signatures. These laws ensure that electronic signatures are legally equivalent to handwritten signatures if the following conditions are met:
Intent to Sign: The signer must intend to sign the document.
Consent: The signer must consent to use electronic signatures.
Association: The electronic signature must be logically associated with the document.
Record Retention: The document must be stored in a form that is accessible for future reference.
2. European Union (eIDAS Regulation)
In the European Union, the eIDAS (Electronic Identification, Authentication, and Trust Services) Regulation governs electronic signatures. It defines three levels of electronic signatures:
Simple Electronic Signature: Basic electronic signatures that offer minimal security.
Advanced Electronic Signature: Signatures that are uniquely linked to the signer and capable of identifying them.
Qualified Electronic Signature: The highest level of security, equivalent to a handwritten signature, and backed by a qualified certificate issued by a trust service provider.
3. Other Jurisdictions
Many other countries have their laws and regulations governing electronic signatures. It’s important to understand the specific requirements in your jurisdiction to ensure compliance.
Types of Acceptable Electronic Signatures
1. Simple Electronic Signatures
These are the most basic form of e-signatures, including typed names or scanned images of handwritten signatures. They are suitable for low-risk transactions where the likelihood of dispute is minimal.
2. Advanced Electronic Signatures
These signatures provide a higher level of security and authentication. They are uniquely linked to the signer, capable of identifying the signer, and created using means that the signer can maintain under their sole control.
3. Qualified Electronic Signatures
Qualified electronic signatures are the most secure form of e-signatures, offering the highest level of trust and legal standing. They are created using a qualified signature creation device and based on a qualified certificate issued by a trust service provider.
Best Practices for Using Electronic Signatures
1. Choose the Right Type of Signature
Select the appropriate type of electronic signature based on the risk and legal requirements of the transaction. For high-risk or legally significant documents, consider using advanced or qualified electronic signatures.
2. Ensure Clear Intent and Consent
Make sure the signer’s intent to sign and their consent to use an electronic signature are clear. This can be done through checkboxes, declarations, or other methods that indicate agreement.
3. Use Secure Platforms
Utilize reputable and secure electronic signature platforms like DocuSign, Adobe Sign, or SignNow. These platforms offer robust security features, including encryption, authentication, and audit trails.
4. Maintain Records
Keep detailed records of signed documents, including the electronic signature, date, and time of signing. Ensure that the documents are stored securely and are accessible for future reference.
5. Stay Informed About Legal Requirements
Regularly review and stay informed about the legal requirements and regulations governing electronic signatures in your jurisdiction. This will help ensure ongoing compliance and avoid legal issues.
Conclusion
Electronic signatures are a valuable tool for modern business transactions, offering convenience, security, and legal validity. By understanding the different types of acceptable electronic signatures and following best practices, you can confidently use e-signatures for various documents and transactions. Always ensure compliance with legal standards and choose the right type of signature for your specific needs.
FAQ Section
1. Are electronic signatures legally binding?
Yes, electronic signatures are legally binding in many jurisdictions, including the United States and the European Union, as long as they meet specific requirements.
2. What are the different types of electronic signatures?
There are three main types: simple electronic signatures, advanced electronic signatures, and qualified electronic signatures. Each type offers different levels of security and legal standing.
3. Which electronic signature platform should I use?
Reputable platforms like DocuSign, Adobe Sign, and SignNow are popular choices. These platforms provide secure and legally compliant e-signature solutions.
4. Can I use a scanned signature as an electronic signature?
Yes, a scanned signature can be used as a simple electronic signature. However, it may not offer the same level of security and authenticity as advanced or qualified electronic signatures.
5. What should I consider when choosing an electronic signature type?
Consider the risk and legal requirements of the transaction. For high-risk or legally significant documents, use advanced or qualified electronic signatures for better security and legal standing.
By following these guidelines and understanding the various aspects of electronic signatures, you can effectively integrate e-signatures into your workflow, ensuring convenience, security, and compliance.
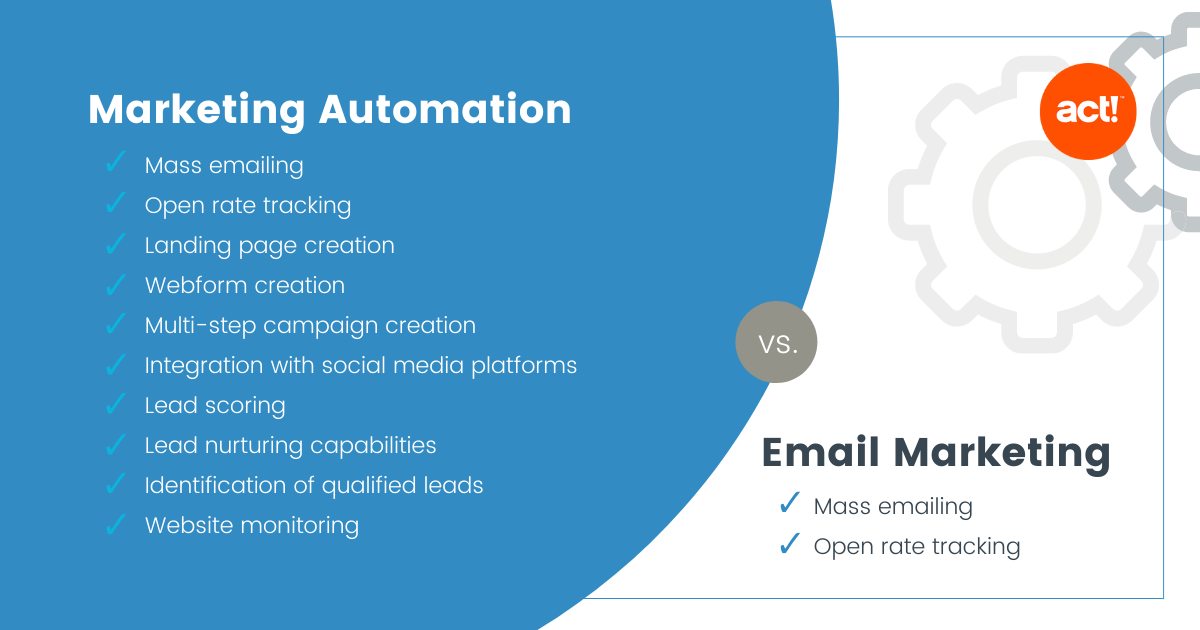
Email marketing focuses on sending targeted messages to a specific audience. Marketing automation uses software to automate and streamline marketing tasks.
Email marketing involves crafting personalized emails to engage with your audience. It is effective for building relationships, promoting products, and nurturing leads. Marketing automation, on the other hand, takes this a step further by automating repetitive tasks and integrating various marketing channels.
This technology allows businesses to streamline workflows, segment audiences, and analyze data more efficiently. While email marketing is a component of marketing automation, the latter provides a more comprehensive approach. Both strategies aim to enhance customer engagement and drive conversions. Choosing between them depends on your business goals and resources.
Introduction To Email Marketing And Marketing Automation
Email marketing and marketing automation are key tools in digital marketing. They help businesses reach and engage with their audience. Both have unique benefits and uses. Understanding the differences is important for effective strategies.
The Role Of Email In Modern Marketing
Email marketing is a direct way to communicate with customers. It involves sending targeted messages to a list of subscribers. These emails can include promotions, news, or personalized content.
Emails are cost-effective and easy to track. Marketers can see who opens and clicks on links. This helps in understanding customer behavior and preferences.
Emails can be personalized with the customer’s name or past purchases. This makes the customer feel valued and increases engagement.
There are different types of emails used in marketing:
Newsletters
Promotional emails
Transactional emails
Welcome emails
Marketing Automation: Beyond Basic Emails
Marketing automation goes beyond sending emails. It uses software to automate repetitive tasks. This includes email campaigns, social media posts, and more.
Automation helps in managing and nurturing leads. It can send personalized messages based on user actions. For example, if a user abandons a cart, automation can send a reminder email.
Here are some features of marketing automation:
Lead scoring
Customer segmentation
Behavior tracking
Automated workflows
Automation saves time and ensures consistent communication. It also provides valuable insights into customer journeys.
Defining Email Marketing
Email marketing is a powerful tool. It involves sending emails to a list of subscribers. This strategy helps businesses connect with their audience. It aims to promote products, services, or updates. Email marketing can build relationships and drive sales.
The Basics Of Email Campaigns
Email campaigns are structured messages sent to a group. These emails can include promotions, newsletters, or announcements. Each email must have a clear goal. This could be increasing sales, building loyalty, or informing customers.
To start, you need an email list. This list includes people who have agreed to receive your emails. You should use an email marketing platform. This tool helps design, send, and track emails.
Build an email list with permission.
Use an email marketing platform.
Set clear goals for each campaign.
Design engaging and relevant emails.
Track and analyze email performance.
Advantages Of Targeted Email Strategies
Targeted email strategies offer many benefits. They allow you to send relevant content to specific groups. This increases engagement and conversion rates.
Here are some key advantages:
Higher Open Rates: Relevant emails are more likely to be opened.
Better Conversion Rates: Personalized emails drive more sales.
Efficient Use of Resources: Focus on high-potential segments.
Enhanced Customer Loyalty: Build stronger relationships with tailored messages.
Using data and segmentation, you can create effective email campaigns. This leads to better results and satisfied customers.
Exploring Marketing Automation
Marketing automation is a powerful tool. It helps businesses streamline their processes. Automation makes marketing more efficient and personalized. Learn how automation can transform your marketing strategy.
Components Of Marketing Automation
Marketing automation consists of several key components. These elements work together to optimize your efforts. Here are the main components:
Email Campaigns: Automated emails sent based on user actions.
Lead Scoring: Assigning scores to leads based on behavior.
Customer Segmentation: Dividing the audience into targeted groups.
Analytics and Reporting: Tracking and measuring campaign performance.
Social Media Integration: Connecting automation tools with social platforms.
Each component plays a vital role. Together, they create a seamless marketing experience.
How Automation Transforms Customer Interaction
Marketing automation changes how you interact with customers. It enables personalized communication. This leads to better customer engagement.
Here are some ways automation transforms customer interaction:
Personalized Messaging: Send tailored messages to each customer.
Timely Responses: Respond to customer actions instantly.
Consistent Engagement: Keep customers engaged with regular updates.
Improved Customer Experience: Offer a smooth and enjoyable journey.
Automation ensures that no customer is left behind. Every interaction feels personal and timely. This builds trust and loyalty.
In conclusion, marketing automation is essential. It enhances your marketing efforts. Use it to provide a better experience for your customers.
Credit: www.act.com
Email Marketing: A Focused Approach
Email marketing is a direct way to engage with your audience. It involves sending emails to a targeted list of subscribers. The goal is to promote products, services, or content. This approach allows for personalized communication. It helps build relationships with customers and leads.
Key Features Of Email Marketing Platforms
Email marketing platforms offer various features to enhance campaigns. These tools help create, send, and track emails. Below are key features of these platforms:
Templates: Pre-designed email templates for quick setup.
Segmentation: Divide your audience into smaller groups.
Automation: Send emails based on user actions.
Analytics: Track open rates, click rates, and more.
A/B Testing: Test different email versions for best results.
Integrations: Connect with CRM and other tools.
Metrics For Measuring Email Success
It’s crucial to measure the success of your email campaigns. Below are key metrics to track:
Metric
Description
Open Rate
The percentage of opened emails.
Click-Through Rate (CTR)
The percentage of clicks on links within the email.
Bounce Rate
The percentage of undelivered emails.
Conversion Rate
The percentage of recipients who completed a desired action.
Unsubscribe Rate
The percentage of recipients who opt-out.
These metrics help understand what works and what needs improvement. They guide future email marketing strategies.
Comprehensive Capabilities Of Marketing Automation
Marketing automation offers more than just email campaigns. It helps businesses streamline tasks, personalize customer experiences, and drive better results. Marketing automation tools provide advanced features that enhance overall marketing efforts.
Integrating Multiple Channels
Marketing automation tools can integrate multiple marketing channels. This includes email, social media, SMS, and web. Using these tools, you can manage all channels from one platform.
Integration simplifies campaign management. You can create cohesive messages. This ensures brand consistency across all platforms.
With integrated channels, tracking customer behavior becomes easier. You can gather data from different sources. This helps in creating targeted marketing strategies.
Channel
Integration Benefits
Email
Personalized campaigns, detailed analytics
Social Media
Increased engagement, wider reach
SMS
Instant communication, high open rates
Web
Real-time updates, customer tracking
Leveraging Ai For Enhanced Customer Journeys
Artificial Intelligence (AI) enhances customer journeys in marketing automation. AI helps in predicting customer behavior. It can analyze large data sets quickly.
Using AI, you can segment your audience. This ensures personalized experiences for each user. AI can recommend products based on past behavior.
AI also optimizes content delivery times. It can send emails when users are most likely to engage. This increases open rates and conversions.
Personalized Recommendations: Suggest products based on history.
Optimized Timing: Send messages at the best times.
Integrating AI into marketing automation creates smarter campaigns. It allows businesses to connect with customers on a deeper level.
Comparing Effectiveness And Efficiency
Email marketing and marketing automation are two powerful tools. They help businesses reach their audience. But which is more effective and efficient? Let’s compare them.
Case Studies: Email Marketing Results
Email marketing has shown great results in many cases. Here are a few examples:
Company A: Increased their open rates by 20% in 3 months.
Company B: Boosted their sales by 15% with targeted emails.
Company C: Reduced their bounce rate by 25% using personalized content.
Email marketing can be very effective. It is simple and direct. But it often requires more manual effort.
Marketing Automation Success Stories
Marketing automation can save time and increase efficiency. Here are some success stories:
Company X: Automated their email campaigns. Saw a 30% increase in leads.
Company Y: Used automation to segment their audience. Boosted engagement by 25%.
Company Z: Streamlined their workflow. Improved their conversion rate by 20%.
Marketing automation can be more efficient. It allows for more complex strategies. You can set it and forget it, saving time for other tasks.
Metric
Email Marketing
Marketing Automation
Open Rates
20% increase
25% increase
Sales Boost
15% increase
20% increase
Time Efficiency
Manual effort
Automated processes
Both methods have their strengths. Choosing the right one depends on your needs and resources.
Choosing Between Email Marketing And Marketing Automation
Deciding between email marketing and marketing automation can be tough. Both have unique benefits. Understanding your business needs helps make the right choice.
Assessing Business Needs
First, look at your business goals. Email marketing works well for simple campaigns. It is great for sending newsletters or promotions. Marketing automation is more complex. It helps manage multiple channels and automate tasks.
Consider the size of your audience. A small list can use email marketing. A large audience may need automation. Think about your team’s skills. Email marketing is easy to learn. Marketing automation needs more training.
Cost-benefit Analysis For Small And Large Enterprises
Next, evaluate the costs and benefits for your business size. Here’s a simple table to compare:
Small Business
Large Enterprise
Cost
Lower cost
Higher cost
Setup Time
Quick setup
Longer setup
Scalability
Limited
Highly scalable
Features
Basic
Advanced
For small businesses, email marketing is cost-effective. It offers quick setup and basic features. For large enterprises, marketing automation is better. It provides advanced features and is scalable.
Best Practices For Both Strategies
Email Marketing and Marketing Automation are powerful tools. Both strategies have their own unique strengths. To maximize their potential, follow best practices. These practices ensure your campaigns are effective and engaging.
Crafting Engaging Content
Engaging content is key in both Email Marketing and Marketing Automation. Your content should be clear and concise. It should also be visually appealing.
Use catchy subject lines: Subject lines should grab attention.
Personalize your messages: Use the recipient’s name and preferences.
Include a clear call-to-action (CTA): Tell your reader what to do next.
Use images and videos: Visual elements enhance the message.
Always test different content formats. Use A/B testing to see what works best. Measure engagement rates and adjust accordingly.
Data-driven Decision Making
Data is crucial in guiding your marketing strategies. Use data to understand your audience better.
Collect and analyze data: Gather data from various sources.
Segment your audience: Group your audience based on behavior and preferences.
Track key metrics: Monitor open rates, click-through rates, and conversions.
Adjust your strategy: Use insights to refine your campaigns.
Using data helps you make informed decisions. It ensures your marketing efforts are targeted and effective.
Practice
Email Marketing
Marketing Automation
Content Creation
Personalize emails, use engaging visuals
Create automated workflows, use dynamic content
Data Utilization
Segment email lists, track engagement
Analyze user behavior, adjust automated triggers
Future Trends In Email And Automation
The future of email marketing and marketing automation is bright. Businesses are integrating advanced technologies to enhance user experience. New trends are emerging that promise to make marketing more efficient and personalized.
Predictive Analytics In Email Campaigns
Predictive analytics is changing email marketing. It helps businesses understand customer behavior. With this, marketers can send personalized emails. These emails match the interests of each customer.
Predictive analytics uses data from past interactions. It predicts what customers will like. This helps in creating targeted email campaigns. The result is higher engagement and conversion rates.
Here is a simple table to show the benefits of predictive analytics:
Benefit
Description
Personalization
Emails tailored to customer preferences
Efficiency
Better use of marketing resources
Engagement
Higher open and click rates
The Evolving Landscape Of Marketing Automation
Marketing automation tools are becoming smarter. They now use AI and machine learning. These tools can perform complex tasks with ease.
Here are some key trends in marketing automation:
AI Integration: Automates repetitive tasks and personalizes customer interactions.
Omnichannel Marketing: Ensures a seamless experience across all channels.
Behavioral Tracking: Monitors user behavior to tailor marketing efforts.
These trends are making marketing automation more effective. Businesses can now focus on strategy. Automation takes care of the repetitive tasks.
Marketing automation also offers detailed analytics. This helps in understanding campaign performance. Businesses can make data-driven decisions to improve their strategies.
In summary, both email marketing and marketing automation are evolving. Predictive analytics and AI are leading this change. These technologies are making marketing more personalized and efficient.
Conclusion: Integrating Email And Marketing Automation
Email marketing and marketing automation are powerful tools. Together, they can amplify your marketing efforts. Combining both can lead to better results. Let’s explore how to integrate them effectively.
Building A Cohesive Marketing Strategy
Start by identifying your goals. What do you want to achieve? More sales, better engagement, or increased brand awareness? Define clear objectives.
Next, segment your audience. Group them based on interests, behavior, or demographics. Use email marketing to send targeted messages. Tailor each email to suit different segments.
Integrate marketing automation. Automate repetitive tasks. Schedule emails, follow-ups, and responses. This saves time and ensures consistency.
Track performance. Monitor key metrics like open rates, click-through rates, and conversions. Use this data to adjust your strategy.
Continuous Learning And Adaptation
Always stay updated. Marketing trends change quickly. Learn from industry experts, webinars, and courses.
Test different strategies. A/B test your email campaigns. Find what works best for your audience.
Gather feedback. Ask your audience for their opinions. Use surveys, polls, and direct questions.
Adapt based on feedback. Refine your approach. Make necessary changes to improve performance.
Review your strategy regularly. Analyze your results. Adjust your tactics to stay effective.
By integrating email marketing and marketing automation, you can create a powerful marketing machine. It helps build a cohesive strategy and encourages continuous learning and adaptation.
Frequently Asked Questions
What Is The Difference Between Marketing Automation And Email Marketing?
Marketing automation involves using software to automate repetitive marketing tasks. Email marketing focuses specifically on sending targeted emails.
Can Email Marketing Be Automated?
Yes, email marketing can be automated. Tools like Mailchimp and HubSpot streamline campaigns, saving time and boosting efficiency.
Why Is Automation The Smartest Choice For Email Marketing?
Automation boosts email marketing by saving time, increasing efficiency, and personalizing messages. It enhances customer engagement and drives conversions.
What Is The Difference Between Email Marketing And Digital Marketing?
Email marketing targets individuals via email campaigns. Digital marketing encompasses a broader range, including social media, SEO, and online ads.
Conclusion
Choosing between email marketing and marketing automation depends on your business goals. Email marketing suits direct communication. Marketing automation offers comprehensive strategies. Both have unique benefits. Analyze your needs and resources. Implement the approach that aligns with your objectives. Effective use can boost engagement and drive growth.
Deel reviews highlight its user-friendly interface and efficient payroll solutions for global teams. Users appreciate its compliance support and ease of use.
Deel is a popular platform designed to streamline payroll and compliance for remote and international teams. It offers an intuitive interface, making it easy for businesses to manage payments and contracts across different countries. Many users praise its ability to handle complex compliance issues, ensuring that companies adhere to local regulations.
The platform supports a variety of payment methods, which enhances flexibility and convenience. Deel’s customer support is also highly rated, providing assistance whenever needed. This makes Deel an attractive option for businesses looking to simplify their payroll and compliance processes while expanding their global workforce.
Deel helps tens of thousands of companies expand globally with unmatched speed, flexibility & compliance. Get our all-in-one Global People Platform that simplifies the way you onboard, offboard, and everything else in between.
Deel is a leading platform for hiring and paying global teams. It simplifies international payroll and compliance. This section introduces Deel and its impact.
Company Overview
Deel was founded in 2018. Its main goal is to streamline global hiring. The company helps businesses hire talent from anywhere. Deel handles payroll, compliance, and other HR tasks.
The platform supports over 150 countries. It ensures that businesses comply with local laws. This makes it easier for companies to expand globally. Deel’s services are trusted by many well-known brands.
Growth And Popularity
Deel’s growth has been impressive. The company has raised significant funding. This includes investments from top venture capital firms. Deel’s valuation has soared rapidly.
Several factors contribute to Deel’s popularity:
Easy-to-use interface
Comprehensive global coverage
Reliable customer support
Compliance with local laws
Deel continues to grow and attract new users. Its features and services meet the needs of modern businesses. Deel is a leader in the global hiring space.
Features Of Deel
Deel is a powerful platform designed to simplify global hiring. It offers a variety of features to ensure seamless operations. Below are some of the standout features of Deel.
Payment Solutions
Deel provides multiple payment solutions for businesses and contractors. Payments can be made in over 120 currencies. This ensures that everyone gets paid in their preferred currency. Deel supports various payment methods like:
Bank transfers
PayPal
Cryptocurrency
These options make it easy to handle international transactions. Payments are processed quickly and securely. This helps in maintaining a smooth workflow.
Compliance Management
Deel excels in compliance management, ensuring you follow local laws. It handles contracts, tax forms, and other legal documents. This reduces the risk of compliance issues. Deel offers templates for various contract types:
Full-time contracts
Freelance agreements
Part-time contracts
These templates are customizable to fit your needs. Deel also manages tax filings and other legal requirements. This makes it easier for businesses to stay compliant.
Deel’s compliance features save time and reduce legal risks. This allows you to focus on growing your business.
Deel helps tens of thousands of companies expand globally with unmatched speed, flexibility & compliance. Get our all-in-one Global People Platform that simplifies the way you onboard, offboard, and everything else in between.
Deel has made a name for itself as a leading platform for global payroll solutions. One key reason for its success is the user experience. From signing up to getting help, Deel users rave about the ease of use.
Onboarding Process
The onboarding process with Deel is smooth and simple. New users find it easy to start. The platform guides you through each step. There is no confusion. A step-by-step guide helps you set up your account. This ensures you don’t miss anything important.
Here is a quick look at the onboarding steps:
Create an account
Verify your email
Fill in your company details
Add your team members
Set up payment methods
This structured approach makes the onboarding process quick and hassle-free.
Customer Support
Customer support is another area where Deel excels. Users have access to a dedicated support team. They are available 24/7 to help with any issues. You can reach out through live chat, email, or phone.
Support Method
Response Time
Live Chat
Instant
Email
Within 24 hours
Phone
Instant
Users appreciate the quick response and helpful answers. This ensures that any issues are resolved promptly.
Overall, Deel’s user experience is top-notch. The onboarding process is simple and customer support is responsive.
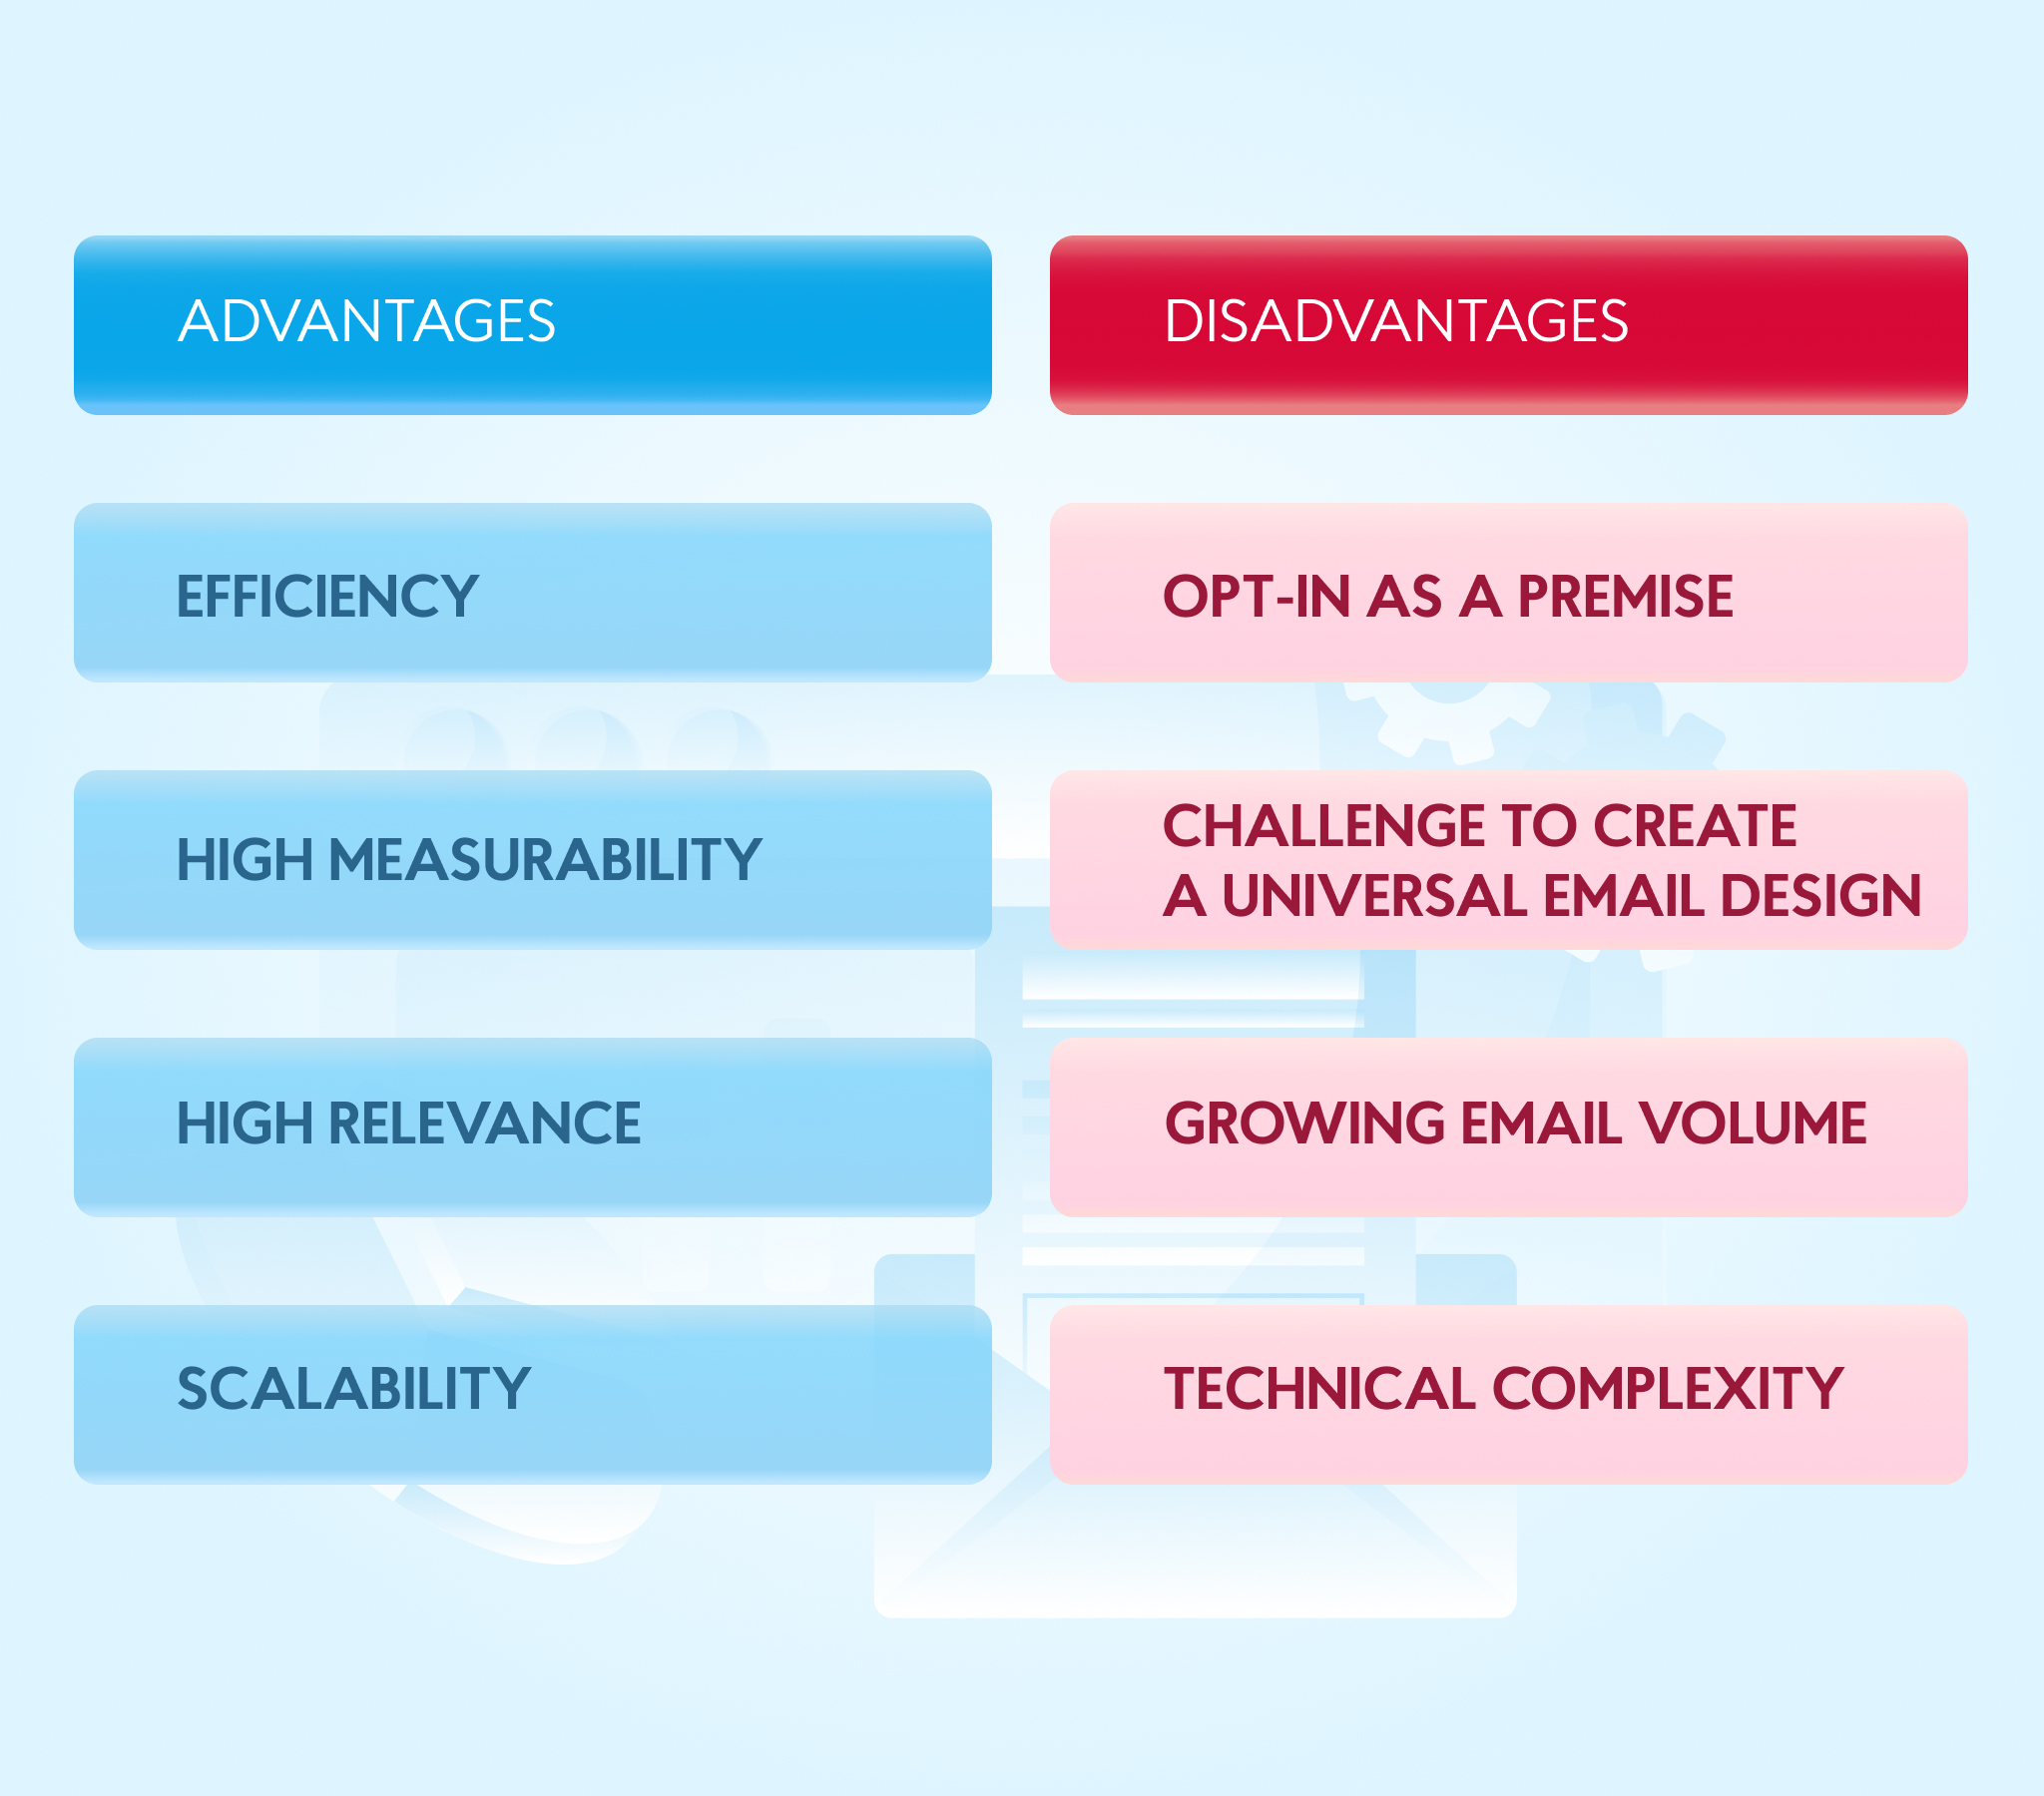
When considering any service, understanding the pros and cons is essential. This guide offers a balanced view of Deel reviews, highlighting both the advantages and drawbacks.
Advantages
Deel provides numerous benefits for businesses and freelancers:
Global Reach: Deel allows businesses to hire talent worldwide.
Compliance: Deel ensures all contracts meet local laws.
Payment Flexibility: Deel supports various payment methods.
User-Friendly Interface: The platform is easy to navigate.
Many users appreciate the streamlined process that Deel offers. The platform handles legal documentation efficiently. This reduces administrative burdens. The customer support is responsive and helpful. Businesses can focus on growth without worrying about compliance.
Drawbacks
Despite its advantages, Deel has some limitations:
Cost: Deel’s services can be expensive for small businesses.
Learning Curve: Some users find the initial setup complex.
Limited Features: Certain features may be missing for specific needs.
Some users report issues with integration. The platform might not sync seamlessly with all tools. Also, the pricing structure can be confusing. Small businesses may find the costs prohibitive. It is crucial to evaluate if Deel fits your specific needs.
Customer Reviews
Customer reviews offer a clear picture of the product’s performance. They provide real insights into user experiences. Let’s dive into the feedback from Deel’s customers.
Deel helps tens of thousands of companies expand globally with unmatched speed, flexibility & compliance. Get our all-in-one Global People Platform that simplifies the way you onboard, offboard, and everything else in between.
Many users praise Deel for its user-friendly interface. The platform is easy to navigate and use.
Customers appreciate the efficient onboarding process. It saves them time and effort.
Deel’s support team often receives commendations for their quick responses. Users find the support helpful and polite.
Another point of praise is the wide range of features. These features help manage payments, contracts, and compliance smoothly.
Here are some common positive points:
Easy to use
Quick onboarding
Responsive support team
Comprehensive features
Common Complaints
While many reviews are positive, some users have complaints. A common issue is the pricing structure. Some users feel it is a bit high.
Another issue is occasional bugs. These bugs can disrupt the user experience. Some users also mention delays in response times during peak hours.
Here are the common complaints:
High pricing
Occasional bugs
Response delays during peak times
Understanding both positive feedback and common complaints helps you make an informed decision.
Comparison With Competitors
Deel stands out in the crowded market of remote work platforms. Comparing it with competitors can help users understand its unique features and benefits.
Similar Platforms
Several platforms offer services similar to Deel. Here are some of the main competitors:
Remote.com: Known for its user-friendly interface and comprehensive features.
Upwork: A popular choice for freelancers and businesses alike.
Payoneer: Primarily focused on financial transactions for freelancers.
These platforms share some common features with Deel:
Deel offers several unique selling points that set it apart from its competitors:
Global Compliance: Deel ensures compliance with local laws worldwide.
Integrated Payroll: Seamlessly manage payroll across multiple countries.
User-Friendly Interface: Easy-to-navigate dashboard for both employers and freelancers.
Automated Contracts: Generate legally compliant contracts in minutes.
24/7 Support: Round-the-clock customer support for all users.
Deel’s emphasis on compliance and payroll integration makes it a strong choice. The automated contract feature saves time and reduces legal risks. Their 24/7 support ensures users get help anytime they need it.
Pricing Plan Of Deel
Deel offers multiple pricing plans to meet different business needs. From small startups to large enterprises, Deel has a plan for everyone. Let’s dive into the details of their pricing and plans.
Subscription Options
Deel provides flexible subscription options to suit various requirements. Here are the primary plans:
Plan
Features
Price
Starter
Up to 5 employees Basic support Standard compliance
$49/month
Professional
Up to 20 employees Priority support Advanced compliance
$199/month
Enterprise
Unlimited employees Dedicated support Custom compliance
Custom pricing
Value For Money
Deel’s plans offer great value for money. Each plan is designed to provide essential services at a competitive price. Whether you are a small business or a large corporation, Deel has a plan that fits your budget.
Here are some reasons why Deel’s pricing is valuable:
Comprehensive compliance features
Reliable customer support
Flexible plan options
Cost-effective for all business sizes
Choosing the right plan can save your business time and money. Deel makes it easy to scale your team globally without breaking the bank.
Deel helps tens of thousands of companies expand globally with unmatched speed, flexibility & compliance. Get our all-in-one Global People Platform that simplifies the way you onboard, offboard, and everything else in between.
After diving deep into the features and user experiences of Deel, we have reached our final verdict. This section will explore our overall impression and identify who should use Deel.
Overall Impression
Deel stands out as a comprehensive solution for managing global teams. It offers a user-friendly interface and robust features. The platform ensures seamless payroll processing and compliance management.
Users appreciate the platform’s simplicity and efficiency. The customer support is responsive and helpful. The various integrations and automated workflows save time and reduce errors. Security and data privacy are top priorities for Deel, ensuring user trust.
In summary, Deel excels in delivering a reliable and efficient service. It simplifies complex tasks and ensures compliance with international laws.
Who Should Use Deel
Deel is ideal for businesses with remote or global teams. Companies of all sizes can benefit from its features. Here are some groups that should consider using Deel:
Startups: Manage payroll and compliance without hassle.
Small Businesses: Save time with automated processes.
Enterprises: Handle large-scale global operations efficiently.
Freelancers: Ensure timely and compliant payments.
If you fall into any of these categories, Deel could be a game-changer. It simplifies payroll and compliance tasks, allowing you to focus on growth and productivity.
Frequently Asked Questions
What Is Deel?
Deel is a global payroll and compliance platform. It helps businesses hire and pay international employees easily and legally.
How Does Deel Work?
Deel streamlines hiring and payments for global teams. It handles contracts, compliance, and payroll, ensuring smooth operations.
Is Deel Safe To Use?
Yes, Deel is safe. It follows strict security measures and complies with international regulations to protect your data.
Can Deel Handle International Payroll?
Yes, Deel specializes in international payroll. It manages payments in multiple currencies and ensures compliance with local laws.
Deel offers a seamless solution for global hiring and payments. Its user-friendly platform simplifies complex tasks. Companies can scale quickly with Deel’s efficient tools. Considering its benefits, Deel is a valuable asset for businesses. Explore Deel to streamline your international operations and stay competitive.
Email marketing offers cost-effective communication and high ROI. It builds customer relationships and drives conversions efficiently.
Email marketing remains a powerful tool for businesses of all sizes. It allows companies to reach their audience directly and personally. Customizing messages to fit the interests and needs of recipients increases engagement. This marketing strategy is not only affordable but also measurable.
Businesses can track open rates, click-through rates, and conversions to refine their campaigns. Personalization and segmentation make emails more relevant, boosting response rates. Integrating email marketing with other marketing channels enhances overall effectiveness. It nurtures leads, promotes products or services, and maintains customer loyalty. Investing in email marketing provides significant benefits, making it an essential part of any marketing strategy.
Introduction To Email Marketing
Email marketing is a powerful tool for businesses. It helps connect with customers directly. You can share updates, promotions, and news. It is cost-effective and can reach many people quickly.
Email marketing is different from other forms of marketing. It uses email to talk to customers. This direct approach makes it very effective.
The Resilience Of Email
Email has been around for a long time. It has survived many changes in technology. Despite new social media platforms, email remains strong. People still check their emails daily. This makes it a reliable tool for businesses.
Emails can be saved and revisited. This is unlike social media posts that can get lost. Emails create a personal connection with the reader. This connection helps in building trust and loyalty.
Why Email Stands Out In Digital Marketing
Wide Reach: Almost everyone has an email address.
Cost-Effective: It is cheaper than other marketing methods.
Personalization: Emails can be tailored to each recipient.
Measurable: You can track open rates and clicks easily.
High Engagement: People tend to read and respond to emails.
Emails are direct and go straight to the inbox. This makes them hard to ignore. Unlike ads that can be skipped, emails demand attention.
Email marketing allows for segmentation. You can target specific groups with relevant content. This increases the chances of engagement and conversion.
Cost-effectiveness Of Email Campaigns
Email marketing is a powerful tool. It offers great value at a low cost. Businesses of all sizes can benefit. Email campaigns save money. They also deliver impressive results.
Comparing Email To Other Marketing Channels
Many marketing channels exist. Examples include social media, PPC, and print ads. Each has its own cost and benefit.
Email marketing stands out. It is cheaper than most other options. See the comparison below:
Marketing Channel
Cost per Campaign
Reach
Email Marketing
$0.01 – $0.05 per email
Thousands
Social Media Ads
$0.50 – $1.00 per click
Varies
Print Ads
$500 – $5,000 per ad
Limited
PPC (Google Ads)
$1.00 – $2.00 per click
Varies
Maximizing Roi With Email
Email marketing boasts a high return on investment (ROI). For every $1 spent, the average return is $42.
Here are ways to maximize ROI:
Segment your audience. Send targeted messages.
Use compelling subject lines. Increase open rates.
Track and analyze performance. Adjust strategies accordingly.
Email campaigns are efficient. They offer high returns. They are easy to track. Businesses can adjust tactics in real time.
Targeting And Personalization
Email marketing offers many benefits. One of the most impactful is targeting and personalization. By tailoring messages, businesses can engage their audience more effectively. Personalized emails feel more relevant to the recipient. This increases the chances of interaction and conversion.
Segmentation Strategies
Segmentation is key in email marketing. It involves dividing your email list into smaller groups. Each group shares common characteristics. This can include:
Age
Location
Purchase history
Browsing behavior
By segmenting your list, you can send more targeted emails. These emails speak directly to the needs and interests of each group. This makes your emails more effective.
Customized Content For Higher Engagement
Creating customized content is another powerful strategy. This involves tailoring the email content to match the preferences of each segment. For example:
Segment
Customized Content
New subscribers
Welcome emails with introductory offers
Frequent buyers
Exclusive discounts and loyalty rewards
Inactive users
Re-engagement emails with special incentives
Customized content drives higher engagement rates. Recipients are more likely to open and act on emails that feel personal. This leads to better results for your email marketing campaigns.
Credit: nix-united.com
Measurable Results
Email marketing offers clear, measurable results. This makes it a favorite for marketers. You can track opens, clicks, and conversions easily. Knowing these metrics helps improve campaigns.
Tracking Opens And Clicks
Tracking email opens is simple. When someone opens your email, you get a notification. This tells you how many people read your message. More opens mean more interest.
Clicks are also important. When a reader clicks a link in your email, you know they are interested. This helps you understand what works. You can see which links get the most clicks. This data is valuable. It tells you what your audience likes.
Analyzing Conversion Rates
Conversion rates show how many people take action. This could be buying a product or signing up for a webinar. Tracking these actions is key. It shows if your email was effective.
You can use this data to improve. If conversion rates are low, try changing your strategy. Test different subject lines or offers. See what works best for your audience.
Here is a simple table to illustrate the key metrics:
Metric
Description
Opens
Number of times the email was opened
Clicks
Number of times links were clicked
Conversion Rates
Percentage of actions taken from email
Using these metrics helps you grow. You can see what works and what does not. This makes your email marketing more effective.
Increasing Brand Awareness
Email marketing plays a vital role in increasing brand awareness. Sending regular emails keeps your brand top-of-mind. People recognize your name and logo. They feel more connected to your business. This familiarity can lead to higher engagement and conversions.
Consistent Email Branding
Consistent branding is crucial in email marketing. Use the same logo, colors, and fonts. This makes your emails easily recognizable. Create a template that matches your brand’s style. This ensures every email feels cohesive and professional.
Element
Consistency Tip
Logo
Always use the same version.
Colors
Stick to your brand’s color palette.
Fonts
Use the same fonts in all emails.
Educational Content Builds Credibility
Educational content helps build credibility. Share tips, guides, and how-tos in your emails. This shows your expertise in your field. People trust businesses that provide valuable information.
Send how-to guides to solve common problems.
Share tips and tricks related to your industry.
Provide updates on new trends and technologies.
Educational emails build trust and loyalty. People appreciate useful content. They are more likely to engage with your brand.
Automation And Efficiency
Email marketing is powerful. It saves time and boosts productivity. Automation helps you send emails at the right time. Efficiency ensures you reach your audience effectively.
Setting Up Drip Campaigns
Drip campaigns are automated. They send pre-written emails on a schedule. You can nurture leads over time. Drip campaigns keep your audience engaged.
Step
Description
1
Identify your goal. Know what you want to achieve.
2
Segment your audience. Group them by interests or behavior.
3
Create your email series. Write emails for each stage.
4
Schedule your emails. Decide when each email will be sent.
5
Monitor and adjust. Track results and make changes if needed.
Trigger-based Emails For Timely Responses
Trigger-based emails are smart. They respond to user actions. This makes your emails more relevant. They help you send the right message at the right time.
Welcome emails: Sent when someone subscribes.
Abandoned cart emails: Sent when a cart is left behind.
Birthday emails: Sent on a subscriber’s birthday.
Re-engagement emails: Sent to inactive subscribers.
Trigger-based emails increase engagement. They improve your email open rates. Your audience feels more connected.
Boosting Sales With Promotions
Email marketing can be a powerful tool to increase sales. Promotions within emails can drive customer engagement and conversions. You can create a sense of urgency by offering exclusive deals and time-limited offers. This encourages subscribers to take action quickly, boosting sales effectively.
Exclusive Deals For Subscribers
Offering exclusive deals to your email subscribers is a smart strategy. These deals make subscribers feel special and valued. They are more likely to purchase because they get offers unavailable to others.
Special discounts on products
Early access to new arrivals
Exclusive bundles or packages
Use a table to display exclusive deals:
Deal Type
Benefit
Discount
Save money on purchases
Early Access
Shop new products first
Exclusive Bundle
Get more for less
Time-limited Offers To Create Urgency
Time-limited offers are another effective way to boost sales. These offers create a sense of urgency. Subscribers feel the need to act fast to avoid missing out.
Flash sales
Limited-time discounts
Holiday specials
Highlight the end date of the offer. Use countdown timers in your email to show urgency. This visual cue can prompt quicker actions from subscribers.
Here is an example code snippet for a countdown timer:
In summary, leveraging exclusive deals and time-limited offers can significantly boost your email marketing sales. Tailor your promotions to create value and urgency, encouraging subscribers to act quickly.
Credit: www.linkedin.com
Customer Retention And Loyalty
Customer retention and loyalty are key factors in business growth. Email marketing is an effective tool for these objectives. It helps keep customers engaged and loyal to your brand.
Personalized Loyalty Programs
Email marketing allows you to create personalized loyalty programs. These programs can include exclusive offers, discounts, and rewards. Personalization makes customers feel special and valued.
You can segment your email list based on customer behavior. This helps target specific groups with relevant offers. Such targeted communication increases the chances of repeat purchases.
Regular Updates And Newsletters
Regular updates and newsletters keep your customers informed. Share new product launches, company news, or upcoming events. This keeps your brand at the top of their minds.
Email newsletters can also offer valuable content. Share tips, guides, or how-tos related to your products. This builds trust and positions your brand as an authority.
Benefits of Regular Updates:
Keep customers informed
Promote new products
Build brand authority
Steps to Create Effective Newsletters:
Segment your email list
Personalize your content
Include clear calls-to-action
With the right strategy, email marketing boosts customer retention and loyalty. Personalized programs and regular updates keep customers engaged. This ensures long-term business success.
Integrating With Other Marketing Efforts
Email marketing shines when integrated with other marketing efforts. Combining email with social media, website traffic, and other channels can amplify results.
Email And Social Media Synergy
Email and social media together create powerful marketing synergy. They can complement each other and enhance overall reach.
Cross-Promotions: Promote social media channels in your emails. Encourage subscribers to follow you.
Exclusive Content: Share exclusive content on social media. Tease it through emails.
Social Proof: Share social media testimonials in your emails. Build trust with your audience.
Here is a table showing the benefits of combining email and social media:
Strategy
Benefit
Cross-Promotions
Increase followers and engagement
Exclusive Content
Drive curiosity and engagement
Social Proof
Build credibility and trust
Driving Traffic To Your Website
Email marketing is a great tool for driving traffic to your website. Well-crafted emails can encourage readers to visit your site.
Clear Call-to-Action: Add a clear call-to-action in your emails. Direct readers to your site.
Personalized Content: Use personalized content to engage readers. Make them curious to learn more.
Special Offers: Include special offers or discounts. Encourage clicks to your website.
Effective email marketing can significantly boost your website traffic. This can lead to higher conversions and sales.
Legal And Ethical Considerations
Email marketing offers many benefits. But, it is vital to follow legal and ethical guidelines. This ensures trust and compliance with laws. Ignoring these can harm your brand and result in penalties.
Adhering To Email Regulations
Several laws govern email marketing. The most known is the CAN-SPAM Act. It sets rules for commercial emails.
Here are key points to follow:
Include a clear subject line.
Provide a valid physical address.
Offer an easy opt-out method.
Honor opt-out requests promptly.
Following these rules helps maintain trust. It also protects your brand from legal issues.
Best Practices For Email Marketing
Ethical email marketing builds long-term relationships. Use these best practices to achieve this:
Get Permission: Always get consent before sending emails.
Relevant Content: Send content that matches subscriber interests.
Personalization: Use the recipient’s name in the email.
Frequency: Avoid sending too many emails. Stick to a regular schedule.
Transparency: Be clear about who you are and your intentions.
Following these practices improves email performance. It also builds trust with your audience.
Frequently Asked Questions
What Are Some Benefits Of Email Marketing?
Email marketing boosts customer engagement. It drives conversions and sales. It’s cost-effective and measurable. It builds brand loyalty.
Why Is Email Marketing So Effective?
Email marketing is highly effective due to its direct communication, personalized content, high ROI, and broad reach. It builds strong customer relationships and drives conversions.
What Are The Benefits Of E Marketing?
E-marketing offers cost-effective advertising, global reach, personalized targeting, and real-time analytics. It enhances customer engagement and boosts brand visibility.
What Are The Benefits Of Using Email?
Email offers fast and efficient communication. It provides a written record of conversations. You can easily attach files and documents. Email is cost-effective and environmentally friendly. It allows for global reach and accessibility.
Conclusion
Email marketing offers significant benefits for businesses. It boosts customer engagement, drives sales, and provides measurable results. Implementing an effective email strategy can enhance brand loyalty and improve communication. Start leveraging email marketing today to achieve your business goals and stay ahead of the competition.
Yes, email marketing still works effectively. It remains a valuable tool for businesses to engage with their audience.
Email marketing continues to be a powerful strategy in the digital marketing toolkit. Businesses use it to build relationships, promote products, and share updates directly with customers. With a well-crafted email campaign, companies can reach a targeted audience, increase brand awareness, and drive conversions.
Personalization and segmentation make emails more relevant, boosting open and click-through rates. Regularly analyzing performance metrics helps optimize future campaigns. Despite the rise of social media, email marketing offers a direct and personal way to communicate. For these reasons, it remains a cornerstone of successful marketing strategies.
The Evolution Of Email Marketing
Email marketing has transformed over the years, from simple mass mailings to highly personalized messages. The journey has been incredible. Businesses have adapted to new technologies. They have also focused on creating better customer experiences.
From Mass Mailing To Personalization
In the early days, email marketing was straightforward. Companies sent the same email to everyone. This method was called mass mailing. It worked, but it was not efficient. People started ignoring these emails.
Then, personalization changed the game. Marketers began to tailor emails to individual preferences. They used customer data to create relevant content. Personalized emails have higher open rates. They also boost engagement and conversion rates.
Aspect
Mass Mailing
Personalization
Content
Same for all
Customized
Engagement
Low
High
Conversion
Low
High
Technological Advancements Shaping Emails
Technology has played a crucial role. Email marketing tools have evolved. Automation is now a key feature. Marketers can schedule emails and set triggers. This saves time and increases efficiency.
Artificial Intelligence (AI) is another big player. AI helps in analyzing customer behavior. It suggests the best times to send emails. AI also helps in writing content. This makes emails more engaging.
Interactive emails are gaining popularity. These emails include elements like polls, videos, and sliders. They make the email experience more dynamic. Customers love interacting with these emails.
Automation: Schedule and trigger emails
AI: Analyze behavior and suggest timings
Interactive Elements: Polls, videos, sliders
The evolution of email marketing is ongoing. New technologies and strategies emerge every day. Staying updated is key to success.
Current Email Marketing Statistics
Email marketing remains a powerful tool for businesses. Understanding current statistics helps optimize your campaigns. This section delves into key metrics that prove email marketing’s effectiveness.
Open Rates And Click-through Metrics
Open rates indicate how many recipients open your email. The average open rate across industries is around 20%. However, some sectors see even higher rates.
Industry
Open Rate
Healthcare
21.8%
Retail
18.3%
Finance
23.4%
Click-through rates (CTR) show the percentage of recipients who click links in your email. The average CTR is about 2.5%. Yet, it varies by industry.
Healthcare: 3.1%
Retail: 2.2%
Finance: 2.9%
Roi And Conversion Benchmarks
Return on investment (ROI) is crucial in email marketing. On average, businesses earn $42 for every $1 spent on email marketing.
Conversion rates show how many recipients take the desired action. The average email conversion rate is around 2.3%. This metric varies by campaign goals and industry.
Industry
Conversion Rate
Healthcare
2.6%
Retail
2.1%
Finance
2.7%
Email marketing remains effective with high ROI and conversions. These metrics provide a clear picture of its value.
Comparing Channels: Email Vs Social Media
Email marketing and social media are both powerful tools. They each have unique strengths. This section will compare these channels. We will look at audience engagement levels and content longevity.
Audience Engagement Levels
Audience engagement is key for any marketing strategy. Let’s compare email and social media.
Channel
Engagement Type
Engagement Rate
Email
Open Rate
20-30%
Social Media
Like, Share, Comment
1-5%
Email has a higher open rate.
Social media has more interaction types.
Emails feel more personal. People check emails daily. Social media offers quick interactions. But, it has lower engagement rates.
Longevity Of Content On Each Platform
The lifespan of content varies. Email and social media differ greatly here.
Email: Emails stay in the inbox until deleted. They can be read anytime.
Social Media: Posts have a short lifespan. They are often buried in the feed.
Email content lasts longer. Social media posts have a fleeting presence. This impacts how often you need to post.
Email provides a reliable touchpoint. Social media requires constant updates. Choose your channel based on your goals.
Consumer Behavior And Email Interactions
Understanding how consumers interact with emails is crucial. This knowledge helps create effective email marketing strategies. Consumer behavior changes constantly. Marketers need to adapt to these changes. Let’s look at some key aspects.
Preferences In Email Content
Consumers prefer personalized content. Emails should address their needs and interests. Generic content often gets ignored.
Use the recipient’s name in the email.
Offer tailored product recommendations.
Send emails based on past behaviors.
Including relevant offers increases engagement. Interactive elements in emails also boost interest. Think about polls, quizzes, and interactive images.
Impact Of Mobile Devices On Email Consumption
More people read emails on mobile devices. This shift affects how emails are designed and consumed.
Aspect
Impact
Design
Emails must be mobile-friendly.
Load Time
Emails should load quickly on mobile.
Content Length
Shorter content is better for mobile.
Responsive design is essential. Emails should adjust to different screen sizes.
Use single-column layouts.
Ensure buttons are easy to tap.
Optimize images for faster loading.
Mobile-friendly emails improve user experience. They lead to higher open and click rates.
Email Marketing Strategies That Drive Success
Email marketing is still powerful. It connects businesses with customers. Success requires smart strategies. Effective tactics ensure high engagement and conversions.
Segmentation And Targeting
Segmentation divides your email list. It groups customers by behavior and interests. This makes your messages relevant. Targeting helps you reach the right audience. Tailored emails increase open rates and clicks.
Segmentation Criteria
Benefits
Geographic Location
Localized offers
Purchase History
Personalized recommendations
Customer Preferences
Relevant content
Segment customers by age.
Group users by purchase frequency.
Target based on engagement level.
Automation And Trigger-based Emails
Automation saves time. It sends emails automatically. Trigger-based emails respond to user actions. They engage customers instantly.
Welcome emails for new subscribers.
Cart abandonment reminders.
Birthday and anniversary emails.
Automation tools are essential. They streamline the process. Tools like Mailchimp and HubSpot are popular. They offer templates and analytics. Use them for better results.
Challenges In Modern Email Marketing
Email marketing has changed over the years. New challenges have appeared. Marketers must adapt to stay effective. Below are some key challenges faced today.
Dealing With Spam Filters
Spam filters have become more advanced. They can block many emails. This affects email deliverability. Marketers must ensure emails do not look like spam. Here are some tips:
Use a recognizable sender name.
Avoid spammy words like “free” or “urgent”.
Ensure email content is relevant and valuable.
Use double opt-in for subscribers.
Maintaining Subscriber Lists
Keeping an updated subscriber list is crucial. Old or inactive emails can harm deliverability. Regularly clean your list. Remove inactive subscribers. This keeps your list healthy. Here are some steps:
Send re-engagement emails to inactive subscribers.
If no response, remove them from your list.
Encourage subscribers to update their info.
Also, segment your list. This helps send targeted emails. Subscribers receive content they care about. Engagement and open rates improve. Personalization is key.
Clean lists regularly, and segment for better targeting.
Solution
Spam Filters
Use recognizable sender names, and avoid spammy words.
Maintaining Subscriber Lists
Use recognizable sender names, avoid spammy words.
Crafting Compelling Email Content
Email marketing continues to be a powerful tool for businesses. The key to success lies in crafting compelling email content. Engaging emails can increase open rates and conversions. This section will guide you in designing engaging emails and writing subject lines that convert.
Designing For Engagement
Good design is crucial for engaging emails. Simple, clean designs perform best. Use a clear layout with plenty of white space. Highlight your main message with bold text or colors.
Images can make your email more appealing. Use high-quality images that relate to your content. Avoid large files to ensure fast loading times.
Include a clear call-to-action (CTA). Make your CTA button stand out with bright colors. Use action-oriented words like “Buy Now” or “Learn More”.
Simple, clean design
High-quality images
Clear call-to-action
Writing Subject Lines That Convert
The subject line is the first thing your reader sees. Make it compelling and clear. Use fewer than 50 characters to ensure it displays correctly.
Personalize the subject line with the recipient’s name. Personalized emails are more likely to be opened. Use questions or urgency to grab attention.
Keep your subject line relevant to the email content. Avoid spammy words like “Free” or “Buy Now”. These can send your email to the spam folder.
Keep it under 50 characters
Personalize with the recipient’s name
Avoid spammy words
Good Subject Line
Bad Subject Line
John, your discount is waiting!
BUY NOW! LIMITED TIME OFFER!
Need tips for your next trip?
FREE Vacation Tips Inside!
The Future Of Email Marketing
Email marketing is evolving rapidly. It is no longer just sending newsletters. Marketers now use advanced tools and techniques. The future of email marketing looks bright and promising. New technologies are changing how emails are created and delivered.
Predictive Analytics And Ai
Predictive analytics and AI are game changers. They help understand customer behavior. AI can analyze large data sets quickly. This helps in making better decisions. Predictive analytics can forecast trends and preferences. This makes emails more personalized and relevant.
AI tools can automate email campaigns. They can send emails at the best times. These tools also help in segmenting the audience. This ensures the right message reaches the right person. Using AI and predictive analytics can boost open rates and conversions.
The Role Of Interactive Emails
Interactive emails engage users more. They include elements like buttons, polls, and quizzes. These elements make the email experience enjoyable. Interactive emails can increase user engagement.
Here are some benefits of interactive emails:
Higher click-through rates
Better user experience
Increased conversion rates
More social shares
Interactive elements can also provide instant feedback. This helps in understanding user preferences better. Using interactive emails can make your campaigns stand out.
Frequently Asked Questions
Is Email Marketing Still Effective Today?
Yes, email marketing remains highly effective today. It offers high ROI, personalizes communication, and reaches a broad audience.
Does Email Marketing Work Anymore?
Yes, email marketing still works. It remains effective for customer engagement, lead generation, and driving sales. Personalization and targeted campaigns enhance results.
Is Email Marketing Still Effective In 2024?
Yes, email marketing will remain effective in 2024. It offers high ROI, personalized content, and direct customer engagement.
Is Email Marketing Still Alive?
Yes, email marketing is still alive. It remains a powerful tool for businesses to engage with customers and drive sales.
Conclusion
Email marketing remains a powerful tool for businesses. It boosts engagement and drives conversions. By crafting personalized and relevant content, you can enhance your customer relationships. Embrace email marketing strategies to stay ahead in the competitive market. Keep evolving and adapting to new trends for sustained success.