Email marketing offers direct communication with subscribers, while social media marketing targets a broader audience on social platforms. Email marketing and social media marketing serve distinct purposes in a digital strategy.
Email marketing focuses on personalized, one-on-one communication and often drives higher conversion rates. Social media marketing, on the other hand, excels in brand awareness and engagement across diverse user bases. Both channels can complement each other effectively. Understanding their unique strengths helps businesses maximize their marketing efforts.
Companies can leverage email marketing to nurture leads and build customer loyalty. Social media marketing can be used to increase brand visibility and foster community engagement. Utilizing both strategies ensures a well-rounded approach to digital marketing.
Introduction To Email And Social Media Marketing
Email marketing and social media marketing are key digital strategies. They help businesses reach customers online. Understanding both can improve your brand’s visibility. Let’s explore their roles and benefits.
The Rise Of Digital Marketing
Digital marketing has changed the way businesses connect. Traditional methods are less effective now. Digital platforms offer wider reach and engagement.
Emails and social media are popular tools. They offer direct communication channels. Businesses can share updates, promotions, and build relationships.
| Aspect | Email Marketing | Social Media Marketing |
|---|---|---|
| Reach | Targeted audience | Broad audience |
| Engagement | Personalized | Interactive |
| Cost | Low | Variable |
Pivotal Roles In Brand Strategy
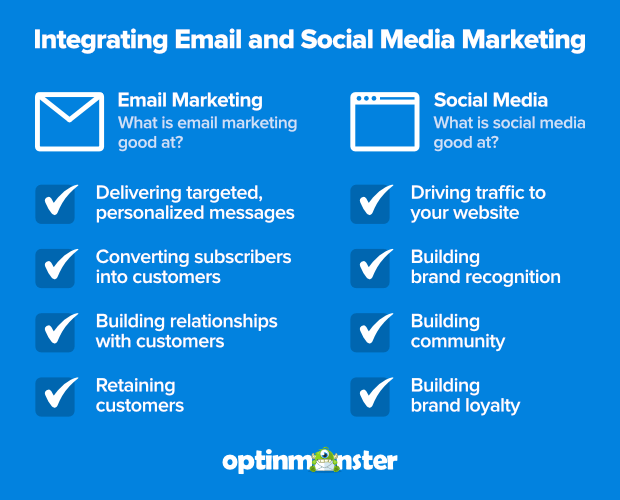
Email marketing is crucial for building customer loyalty. It offers personalized content. It helps in nurturing leads and driving sales.
Social media marketing boosts brand awareness. It encourages user interaction. It helps in creating a community around your brand.
- Email marketing is great for detailed information.
- Social media marketing is good for quick updates.
- Choose email marketing for targeted campaigns.
- Choose social media for wider reach and engagement.
Core Strengths Of Email Marketing
Email marketing offers unique advantages. It helps businesses engage customers directly. Let’s explore its core strengths.
Direct Customer Engagement
Email marketing provides direct access to your audience. Emails land straight in the inbox. This ensures your message reaches the recipient.
Unlike social media, emails avoid algorithm restrictions. You control the delivery and timing. This direct approach fosters a stronger connection.
Customizable Content
Email marketing allows high customization. You can tailor content to each recipient. Personalized emails increase engagement and conversion rates.
Use customer data for dynamic content. Segment your audience and send relevant messages. Customization helps meet specific needs and interests.
Measurable Results
Email marketing offers detailed analytics. Track open rates, click-through rates, and conversions easily. These metrics help evaluate campaign success.
Data-driven insights enable continuous improvement. Optimize your strategies based on performance. This measurable approach ensures effective marketing efforts.
Key Advantages Of Social Media Marketing
Social media marketing offers several unique advantages. These benefits can help businesses grow and reach their goals. Let’s explore the key advantages in detail.
Wide Audience Reach
Social media platforms have millions of users. This allows businesses to reach a vast audience. Platforms like Facebook, Instagram, and Twitter connect you with diverse groups. You can target specific demographics and interests. This makes your marketing efforts more effective.
Viral Potential
Content on social media can spread quickly. This is known as viral potential. A single post can reach thousands, even millions, of people. Engaging content gets shared, liked, and commented on. This increases your brand’s visibility and recognition.
Building Brand Community
Social media helps build a community around your brand. You can interact directly with your audience. This builds trust and loyalty. Responding to comments and messages shows you care. Regular updates keep your audience engaged and informed.
Analyzing Audience Targeting Capabilities
Understanding your audience is key in digital marketing. Both email and social media platforms provide powerful tools for targeting. Let’s dive into how each method allows you to target your audience effectively.
Precision In Email Segmentation
Email marketing lets you segment your audience with precision. You can divide your email list by age, gender, location, and buying behavior. This ensures your message reaches the right people at the right time.
For example, you can send birthday offers to users on their special day. You can also send product recommendations based on past purchases. This level of targeting increases engagement and conversion rates.
| Segmentation Criteria | Example |
|---|---|
| Demographics | Age, Gender |
| Geographics | City, Country |
| Behavioral | Purchase History, Website Visits |
Social Media’s Diverse Demographics
Social media platforms offer access to a broad audience. Each platform attracts different demographics. For instance, Instagram is popular among younger users. LinkedIn is more business-focused.
You can target users based on interests, behaviors, and connections. This ensures your ads are seen by the most relevant people. Social media also provides real-time feedback and engagement.
- Facebook: Diverse age groups, family-oriented
- Instagram: Younger audience, visual content
- LinkedIn: Professionals, B2B marketing
- Twitter: Real-time updates, news-oriented
Using these platforms allows you to reach different segments effectively. You can adjust your content to suit the platform’s audience. This maximizes your campaign’s reach and impact.
Investment And Roi Comparison
Understanding the return on investment (ROI) is crucial for any marketing strategy. Email marketing and social media marketing both offer unique benefits. This section explores the cost-effectiveness and ROI metrics of both methods.
Cost-effectiveness Of Email
Email marketing can be highly cost-effective. The costs include:
- Email marketing software
- Content creation
- List management
Email marketing software ranges from free to premium plans. Free plans often have limitations. Premium plans offer more features and better analytics. Content creation involves writing engaging emails. Good content can increase open rates and click-through rates. List management involves maintaining a clean and updated email list. A clean list ensures better deliverability and engagement.
Benefits of Email Marketing:
- Direct communication with your audience
- High conversion rates
- Low cost per acquisition
Roi Metrics For Social Media
Social media marketing includes various platforms. Each platform has different costs and ROI metrics. Costs include:
- Ad spend
- Content creation
- Management tools
Ad spend varies based on platform and audience targeting. Content creation involves graphics, videos, and posts. Good content can increase engagement and followers. Management tools help schedule posts and analyze performance.
Benefits of Social Media Marketing:
- Wider audience reach
- Increased brand awareness
- Real-time engagement
Below is a comparison table of the two methods:
| Criteria | Email Marketing | Social Media Marketing |
|---|---|---|
| Cost | Low to Medium | Medium to High |
| Reach | Limited to subscribers | Global |
| Engagement | High | Varies |
| ROI | High | Medium |
Both email and social media marketing offer unique advantages. The choice depends on your business goals and budget.
Interactivity And User Engagement
Email marketing and social media marketing both offer unique ways to engage users. Understanding their interactive features and how they drive user engagement can help businesses choose the right strategy.
Interactive Features In Email
Email marketing provides several interactive features that can enhance user engagement:
- Clickable Links: Direct users to landing pages or product pages.
- Buttons: Encourage users to take specific actions.
- Surveys and Polls: Gather feedback from your audience.
- Personalization: Address users by their names and offer personalized content.
Emails can be tailored to individual preferences. This makes the communication feel more personal and relevant. Dynamic content in emails can change based on user behavior. This enhances the interactivity further.
Engagement Dynamics On Social Platforms
Social media platforms are designed for real-time interaction. They offer several ways to engage users:
- Comments: Users can share their thoughts and feedback instantly.
- Likes and Shares: Content can be liked, shared, or retweeted, increasing its reach.
- Live Videos: Real-time interaction through comments during live streams.
- Stories and Reels: Short, engaging content that disappears after 24 hours.
Social platforms also allow for more visual content. This includes images, videos, and infographics. This type of content often sees higher engagement rates. Users can also tag friends or use hashtags to increase visibility.
| Feature | Email Marketing | Social Media Marketing |
|---|---|---|
| Real-time Interaction | Limited | High |
| Personalization | High | Moderate |
| Visual Content | Moderate | High |
| Feedback Mechanism | Surveys, Polls | Comments, Likes |
Integration Strategies For Maximum Impact
Combining email marketing and social media marketing can boost your reach. Each channel has its strengths. Together, they create a powerful marketing strategy. Let’s explore how to integrate these channels effectively.
Combining Email And Social Media Efforts
Email marketing and social media marketing can support each other. Share your social media links in your email newsletters. This drives traffic to your social platforms.
Encourage your email subscribers to follow you on social media. Offer exclusive content or promotions. This helps build a loyal community across both channels.
Use social media to grow your email list. Share a link to your email sign-up form. Offer a freebie or discount for subscribing. This attracts new leads and grows your audience.
Consistent messaging is key. Ensure your branding and tone are the same on both platforms. This builds trust and recognition with your audience.
Cross-promotional Tactics
Cross-promotional tactics can amplify your marketing efforts. Here are some effective tactics:
- Share snippets of your email content on social media. Include a call-to-action to read the full email.
- Promote your social media contests in your email newsletters. This boosts participation and engagement.
- Use email to announce new social media content. This drives traffic to your posts and increases visibility.
- Feature user-generated content from social media in your emails. This encourages more users to engage with your brand.
Here is a table summarizing these tactics:
| Cross-Promotional Tactic | Benefit |
|---|---|
| Share email snippets on social media | Increases email engagement |
| Promote social contests in emails | Boosts contest participation |
| Announce social content in emails | Drives traffic to social media |
| Feature user-generated content in emails | Encourages social engagement |
Using these tactics, you can maximize your marketing impact. This ensures a cohesive strategy across both email and social media platforms.

Challenges And Pitfalls
Email Marketing and Social Media Marketing both have unique challenges. These pitfalls can hinder your marketing success. Understanding these obstacles can help you navigate them effectively.
Navigating Email Spam Filters
Email spam filters can be a major hurdle. Your emails might not reach the inbox. This can reduce your campaign’s effectiveness.
- Use Clear Subject Lines: Avoid all caps and excessive punctuation.
- Maintain a Clean List: Remove inactive or incorrect email addresses.
- Provide Value: Ensure your content is relevant to your audience.
Spam filters look for certain red flags. Avoiding these can improve your email deliverability.
Dealing With Social Media Algorithm Changes
Social media platforms change their algorithms often. This can affect your reach and engagement.
- Stay Updated: Follow platform news and updates.
- Engage Regularly: Interact with your audience frequently.
- Analyze Performance: Use analytics to track what works best.
Algorithm changes can be frustrating. Adapt quickly to maintain your social media presence.
Future Trends And Evolving Landscapes
The digital marketing world is always changing. Email marketing and social media marketing are two major tools. Each has its own strengths and future trends. Understanding these trends can help businesses stay ahead.
Predictions For Email Marketing
Email marketing continues to be strong. The future looks bright with many new trends. Here are a few key predictions:
- Personalization: Emails will get more personal. Using data, businesses can send tailored messages.
- Interactive Emails: Emails will become more interactive. Users can click, swipe, or even shop within the email.
- Automation: Automation will grow. It will help send the right message at the right time.
- AI Integration: Artificial Intelligence will play a bigger role. AI can predict what customers want and when.
Innovations In Social Media
Social media is also evolving fast. New features and trends are emerging. Here are some innovative trends to watch:
- Video Content: Videos will dominate. Short videos like Reels and TikToks are very popular.
- Social Commerce: Shopping on social media is growing. Users can buy products directly from posts and stories.
- Augmented Reality (AR): AR will enhance user experience. Users can try products virtually before buying.
- Ephemeral Content: Temporary posts, like Stories, will continue to be popular. They create a sense of urgency.
Both email marketing and social media marketing have bright futures. By understanding these trends, businesses can make better decisions.
Case Studies And Success Stories
Examining case studies and success stories helps us understand Email Marketing and Social Media Marketing. Success stories show the effectiveness of each approach. Let’s dive into some real-life examples.
Email Campaign Triumphs
Email campaigns have generated impressive results for many brands. Here are some outstanding examples:
- Company XYZ: They ran a targeted email campaign for a new product. The campaign achieved a 40% open rate and a 20% click-through rate.
- Startup ABC: They used personalized email content to engage their audience. This resulted in a 50% increase in customer retention.
- E-commerce Store: By segmenting their email list, they improved sales by 30%. The focused content resonated well with their customers.
Social Media Marketing Wins
Social Media Marketing has also seen remarkable successes. Below are some notable examples:
- Brand DEF: They created a viral video campaign on Instagram. The video reached over 1 million views in a week.
- Fashion Retailer: Using Facebook ads, they increased their follower count by 25%. This led to a 15% boost in online sales.
- Tech Company: They launched a Twitter hashtag campaign. It trended nationwide and increased website traffic by 40%.
These case studies highlight the potential of both Email and Social Media Marketing. Each has unique strengths and can deliver significant results.
Conclusion And Strategic Recommendations
Email marketing and social media marketing both have their strengths. Each has its unique way of engaging audiences. Choosing the right strategy can boost your business. Let’s dive into strategic recommendations.
Choosing The Right Mix
Finding the right balance is key. Here are some tips:
- Understand your audience. Know their preferences.
- Use email marketing for direct communication. It’s personal and targeted.
- Leverage social media for brand awareness. Engage with a wider audience.
- Combine both for maximum impact. Send newsletters and share on social media.
Consider this table to help decide:
| Criteria | Email Marketing | Social Media Marketing |
|---|---|---|
| Audience Reach | Narrow and targeted | Broad and diverse |
| Engagement | High with personalized content | High with interactive content |
| Cost | Low with high ROI | Variable, can be high |
| Analytics | Detailed and specific | Real-time and broad |
Final Thoughts On Strategic Marketing
Understand each platform’s role. Email marketing builds strong relationships. Social media drives brand visibility. Both strategies complement each other. Use them together for the best results.
Remember these key points:
- Set clear goals. Know what you want to achieve.
- Track performance. Use analytics to measure success.
- Adjust strategies. Be flexible and adapt to changes.
By combining email and social media, you create a robust marketing strategy. This approach can lead to higher engagement and better results.
Frequently Asked Questions
Which Is Better Email Marketing Or Social Media Marketing?
Email marketing offers higher conversion rates and better ROI. Social media marketing excels in brand awareness and engagement. Choose based on your goals.
What Is The Difference Between Social Marketing And Email Marketing?
Social marketing uses social media platforms to engage and interact with audiences. Email marketing sends targeted messages directly to subscribers’ inboxes. Social marketing focuses on building community, while email marketing aims at personalized communication. Both strategies drive engagement and conversions but use different channels.
What Is The Roi Of Email Marketing Vs Social Media?
Email marketing typically offers a higher ROI compared to social media. Email marketing ROI averages around $42 for every $1 spent. Social media ROI varies but is generally lower due to higher competition and fluctuating algorithms.
Is Email Marketing Outdated?
Email marketing is not outdated. It remains a cost-effective, direct way to engage customers and boost sales.
Email marketing targets a specific audience with personalized content. Social media reaches a broader audience with engaging posts.
Email marketing and social media are essential tools in digital marketing strategies. Email marketing offers direct, personalized communication with subscribers. It ensures higher conversion rates due to targeted content. Social media, on the other hand, enhances brand visibility and engagement.
Platforms like Facebook, Instagram, and Twitter allow businesses to interact with a wider audience. Each platform provides unique analytics to measure success. Understanding the strengths of both can help businesses create a balanced marketing strategy. Combining email marketing and social media can amplify outreach and boost overall marketing effectiveness. Effective use of both channels can lead to increased brand loyalty and customer retention.
Introduction To Digital Marketing Battleground
Digital marketing is a key area for businesses today. It involves various strategies to reach customers. Two popular methods are email marketing and social media marketing. Each has its strengths and weaknesses. Understanding these can help businesses choose the right approach.
Email Marketing Essence
Email marketing is direct and personal. Businesses send emails to their subscribers. These emails can be newsletters, promotions, or updates. The goal is to engage and convert customers.
- Personalization: Emails can be tailored to each user.
- High ROI: Email marketing often has a high return on investment.
- Targeted Audience: Emails reach those who have opted in.
Emails allow for detailed content. They can include images, links, and special offers. Businesses can track open rates and click rates. This data helps improve future campaigns.
Social Media Surge
Social media marketing uses platforms like Facebook, Instagram, and Twitter. It aims to reach a broad audience. Social media posts can go viral, reaching many people quickly.
- Wide Reach: Social media has billions of active users.
- Engagement: Users can like, share, and comment on posts.
- Brand Awareness: Social media helps build brand visibility.
Content on social media is often shorter. Posts include images, videos, and hashtags. Businesses can interact with customers in real time. This builds a community around the brand.
| Feature | Email Marketing | Social Media Marketing |
|---|---|---|
| Personalization | High | Medium |
| Reach | Targeted | Broad |
| Engagement | Moderate | High |
| ROI | High | Variable |
Choosing between email marketing and social media marketing depends on goals. Both have unique advantages. Understanding these can lead to successful campaigns.

Historical Evolution
Email marketing and social media have evolved significantly. Both mediums now serve unique roles in digital marketing. Let’s explore their historical evolution.
The Rise Of Email
In the early days of the internet, email was king. It started in the 1970s with ARPANET. By the 1990s, email became a mainstream communication tool. Businesses quickly adopted email for marketing. It was cost-effective and direct. The first mass email was sent in 1978. It promoted a computer product. This marked the birth of email marketing.
Over time, email marketing tools improved. Platforms like Mailchimp and Constant Contact emerged. They made email marketing easier. Marketers could now segment audiences. They could track open rates and engagement. This allowed for more personalized campaigns. Email marketing continues to evolve. Today, it remains a powerful tool for businesses.
Social Media Explosion
The early 2000s saw the rise of social media. Platforms like MySpace and Friendster were early pioneers. Then came Facebook in 2004. It changed everything. Social media became a global phenomenon. People connected like never before. Marketers soon saw the potential. They could reach vast audiences quickly.
Other platforms followed. Twitter launched in 2006. Instagram appeared in 2010. Each platform offered unique features. They provided new ways to engage with audiences. Social media marketing became a key strategy. Businesses created content to share. They interacted with customers directly. This built stronger relationships.
Today, social media is essential for marketing. Platforms constantly evolve. Features like Stories and Reels keep users engaged. Marketers must stay current with trends. Social media offers real-time interaction. It provides valuable insights into customer behavior.
Core Strengths Of Email Marketing
Email marketing offers unique strengths that make it a powerful tool. It allows businesses to reach their audience directly and personally. Let’s explore the core strengths of email marketing in detail.
Personal Touch
Email marketing provides a personal touch. You can use the recipient’s name in the email. Personalized emails have higher engagement rates. Here are some ways to personalize emails:
- Use the recipient’s name
- Segment your email list
- Send tailored content
Metrics And Analytics
Email marketing offers detailed metrics and analytics. You can track various metrics, such as:
| Metric | Description |
|---|---|
| Open Rate | Percentage of opened emails |
| Click-Through Rate (CTR) | Percentage of clicked links |
| Conversion Rate | Percentage of completed actions |
These metrics help you understand your audience better. You can improve your email campaigns based on this data.
Direct Conversion Path
Email marketing offers a direct conversion path. You can include call-to-action buttons within the email. These buttons can lead to:
- Purchases
- Sign-ups
- Downloads
This direct approach increases the chances of conversion. It helps in achieving your business goals efficiently.
Social Media Power Plays
Social media has become a powerful tool in the marketing world. It offers unique advantages over traditional email marketing. Let’s dive into the key areas where social media excels.
Viral Potential
Social media can make content go viral. A single post can reach thousands or millions. This is hard to achieve with email marketing. Viral content increases brand exposure quickly. It can also lead to more followers and engagement.
Here are some ways to create viral content:
- Use eye-catching images or videos
- Create shareable and relatable content
- Engage with trending topics
Brand Personality And Engagement
Social media allows brands to show their personality. Engaging with users builds a loyal community. This is harder to do through email. Social platforms offer real-time interactions. This helps in understanding your audience better.
Benefits of showing brand personality:
- Builds trust with your audience
- Encourages user-generated content
- Makes your brand memorable
Targeting And Retargeting
Social media offers advanced targeting options. You can reach specific demographics easily. Retargeting helps in converting previous visitors. This is done through ads that follow them on different platforms.
Social media targeting options include:
- Age, gender, location
- Interests and behaviors
- Custom audiences
Retargeting benefits:
- Increases conversion rates
- Reminds users of your brand
- Cost-effective way to boost sales
Analyzing Audience Reach
Understanding audience reach is vital in marketing. Email marketing and social media have different strengths. Let’s break down how each method reaches audiences.
Email Subscriber Lists
Email marketing relies on subscriber lists. These lists are built from user sign-ups. Subscribers have already shown interest in your content.
- Subscribers expect to receive emails.
- Emails land directly in their inbox.
- You can segment your list based on user behavior.
Subscriber lists are valuable. Each email can be personalized. This increases engagement and conversion rates.
Social Media Followers And Impressions
Social media marketing depends on followers and impressions. Followers choose to follow your profile. Impressions measure how often your content is displayed.
| Metric | Description |
|---|---|
| Followers | Users who follow your profile. |
| Impressions | How often content appears on screens. |
Social media reach is broad. Content can go viral. This expands audience reach quickly.
Each platform has unique features. For example:
- Facebook: Great for community engagement.
- Instagram: Visual content performs well.
- Twitter: Ideal for real-time updates.
Understanding these differences helps in crafting effective strategies. Both email marketing and social media offer unique ways to reach audiences.
Content Strategy Dynamics
Email marketing and social media have unique content strategies. Each platform demands a different approach. Understanding these dynamics is key. This ensures effective marketing efforts.
Crafting Email Campaigns
Creating email campaigns involves various steps. Here is a simple breakdown:
- Identify your target audience.
- Create engaging subject lines.
- Design visually appealing templates.
- Write concise, clear messages.
- Include a clear call-to-action.
Email campaigns focus on personalized content. This builds a strong connection with the audience. Use segmented lists to target specific groups. This increases open and click-through rates.
Here’s an example of an effective email structure:
Subject: Get 20% Off Your Next Purchase!

Hi [Name],

We appreciate your loyalty. Enjoy 20% off your next order. Use code: THANKYOU.

Shop Now: [Link]

Best Regards,
[Your Brand]
Creating Social Content
Social media content is different. It needs to be quick and engaging. Here are key elements to consider:
- Understand the platform’s audience.
- Use eye-catching visuals.
- Write short, impactful captions.
- Engage with followers regularly.
- Use relevant hashtags.
Each social media platform has unique features. Tailor your content accordingly. For example, Instagram focuses on images, while Twitter is text-centric.
Here’s a simple social media post example:
[Image of product]

Caption: "New arrivals are here! ???? Check out our latest collection! #NewIn #Fashion"

Link: [Your Website Link]
Both email and social media have their strengths. Use the right content strategy for each. This maximizes your marketing success.
Budget Considerations
Choosing between email marketing and social media for your business? Budget is crucial. Let’s look at the cost-effectiveness of both.
Cost-effectiveness Of Email
Email marketing is often cheaper. Sending emails to your list costs little. Many email platforms offer free plans. These free plans usually have limitations. Paid plans offer more features and flexibility. You can reach many people with one email. This makes it cost-effective.
Below is a table showing common email marketing costs:
| Plan Type | Monthly Cost | Subscribers |
|---|---|---|
| Free | $0 | Up to 1,000 |
| Basic | $10-$25 | 1,000 to 5,000 |
| Pro | $50+ | Over 5,000 |
Social Media Advertising Spend
Social media ads can be expensive. Costs depend on your goals. Want to reach a large audience? You may spend a lot. Each platform has different costs.
Here are common costs for social media ads:
- Facebook: $0.50-$2.00 per click
- Instagram: $0.20-$2.00 per click
- Twitter: $0.50-$3.00 per click
Using social media ads, you pay for clicks or impressions. The costs can add up quickly. You need to budget carefully. Social media offers targeting options. These options can make ads more effective.
Integration And Synergy
Integration and synergy between email marketing and social media can enhance your outreach. This combination allows businesses to reach a broader audience. It also helps in creating a cohesive brand experience.
Blending Email And Social Strategies
Businesses often treat email marketing and social media as separate entities. Blending these strategies can provide significant benefits. Use social media to grow your email list. Promote your email newsletter on social platforms. Encourage followers to sign up for exclusive content or offers.
Another method is to share email content on social media. This can increase engagement and reach. Repurpose parts of your email into social posts. Share snippets, images, or quotes from your newsletter. Create a teaser on social media and link to your email sign-up form.
Cross-platform Campaigns
Running cross-platform campaigns can maximize your marketing efforts. Use emails to drive traffic to your social media pages. Include social sharing buttons in your emails. This encourages subscribers to share your content. It can expand your reach beyond your email list.
Conversely, promote email sign-ups on your social media. Create posts that highlight the benefits of joining your email list. Offer incentives like discounts or exclusive content. This can entice followers to subscribe.
| Method | Benefit |
|---|---|
| Promote Newsletter on Social Media | Grow Email List |
| Share Email Content on Social Media | Increase Engagement |
| Use Emails to Drive Traffic to Social Media | Expand Reach |
| Promote Email Sign-Ups on Social Media | Increase Subscribers |
For better results, create unified messaging. Ensure your email and social media campaigns align. Use similar visuals, tones, and messages. This creates a seamless experience for your audience.
Measuring Success And Roi
Understanding the success of your marketing efforts is crucial. Both email marketing and social media provide ways to measure performance. Let’s explore how to track success and ROI for each.
Email Marketing Metrics
Email marketing offers many metrics to gauge performance. These metrics help determine the effectiveness of your campaigns.
- Open Rate: This shows the percentage of recipients who opened your email.
- Click-Through Rate (CTR): This indicates how many recipients clicked on links within your email.
- Conversion Rate: This tracks how many recipients completed a desired action after clicking a link.
- Bounce Rate: This measures the percentage of emails that were not delivered to the recipient’s inbox.
- Unsubscribe Rate: This indicates how many recipients opted out of your email list after receiving an email.
Here’s a table summarizing these metrics:
| Metric | Description |
|---|---|
| Open Rate | Percentage of opened emails |
| Click-Through Rate (CTR) | Percentage of clicked links |
| Conversion Rate | Actions completed after clicking a link |
| Bounce Rate | Undelivered emails |
| Unsubscribe Rate | Recipients who opted out |
Social Media Analytics
Social media platforms also offer ways to measure success. These metrics help understand your audience engagement and campaign effectiveness.
- Engagement Rate: This shows the level of interaction with your content, like likes, shares, and comments.
- Reach: This indicates how many unique users have seen your content.
- Impressions: This measures the total number of times your content is displayed, regardless of clicks.
- Click-Through Rate (CTR): This tracks the percentage of users who clicked on your content.
- Follower Growth: This shows the increase in the number of followers over time.
Here’s a table summarizing these metrics:
| Metric | Description |
|---|---|
| Engagement Rate | Level of interaction with content |
| Reach | Unique users who saw content |
| Impressions | Total times content is displayed |
| Click-Through Rate (CTR) | Percentage of users who clicked content |
| Follower Growth | Increase in followers over time |

Future Trends And Predictions
The future of email marketing and social media is evolving rapidly. Marketers need to stay ahead to leverage new opportunities. This section explores upcoming trends and predictions in both fields.
Adaptive Email Technologies
Adaptive email technologies will shape the future. Emails will become more personalized. AI will analyze user behavior to tailor messages. Dynamic content will replace static content.
Interactive elements will engage users more. Examples include:
- Polls
- Surveys
- Quizzes
Additionally, AMP for email will allow:
- Live content updates
- Real-time data
These advancements will make emails more engaging and effective.
Social Media Innovations
Social media will also see significant changes. Augmented Reality (AR) will become more common. Users will experience immersive content. AR filters and effects will enhance user engagement.
Short-form video content will dominate. Platforms like TikTok and Instagram Reels lead this trend. Marketers will create more bite-sized videos. These videos will be more engaging and shareable.
Chatbots and automated messaging will rise. They will improve customer service. Users will get instant responses to their queries.
Social commerce will grow. Shopping features will be integrated into social platforms. Users can buy products without leaving the app.
Here is a comparison of future trends in email marketing and social media:
| Category | Email Marketing | Social Media |
|---|---|---|
| Personalization | AI-driven | Algorithm-based |
| Engagement | Interactive Elements | AR and Short-form Video |
| Customer Interaction | Dynamic Content | Chatbots |
| Commerce | AMP for Email | Social Commerce |
Both email marketing and social media offer exciting prospects. Marketers should adapt to these trends to stay competitive.
Case Studies
Understanding the impact of email marketing versus social media can be challenging. Studying real-life case studies helps to see the benefits and drawbacks of each method. Let’s explore some successful examples of both strategies.
Successful Email Campaigns
Email marketing has proven effective for many businesses. Here are some examples:
| Company | Campaign | Result |
|---|---|---|
| Company A | Product Launch Email | 50% increase in sales |
| Company B | Newsletter Series | 30% more website traffic |
- Company A: They sent an email about a new product. The email had a clear call to action. Sales increased by 50% within a week.
- Company B: Their newsletter included helpful tips and articles. As a result, their website traffic increased by 30% over a month.
Winning With Social Media
Social media campaigns also show impressive results. Consider these examples:
| Company | Campaign | Result |
|---|---|---|
| Company C | Instagram Giveaway | 5,000 new followers |
| Company D | Facebook Live Event | 2,000 live viewers |
- Company C: They hosted a giveaway on Instagram. The giveaway required followers to tag friends. The campaign resulted in 5,000 new followers.
- Company D: They held a live event on Facebook. The live event featured a Q&A session. It attracted 2,000 live viewers.
Final Verdict
Deciding between email marketing and social media can be challenging. Each has unique strengths and weaknesses. This section will help you make an informed decision. We will provide strategic recommendations and guide you in choosing the right mix.
Strategic Recommendations
Email marketing and social media have different strengths. Email marketing is excellent for direct, personalized communication. It is perfect for nurturing relationships with existing customers. Social media is better for brand awareness and engagement. It helps in reaching a broader audience quickly.
Here are some strategic recommendations:
- Email Marketing: Use for promotions, newsletters, and personalized offers.
- Social Media: Focus on brand engagement, customer service, and reaching new audiences.
Combining both can maximize your reach and effectiveness.
Choosing The Right Mix
The right mix depends on your business goals. Use email marketing to nurture leads and drive conversions. Social media should be used to build brand awareness and community.
Consider these factors:
| Factors | Email Marketing | Social Media |
|---|---|---|
| Audience | Specific, targeted | Broad, diverse |
| Engagement | High, personalized | Wide, public |
| Cost | Lower, cost-effective | Variable, can be high |
| Analytics | Detailed, actionable | General, broad |
Evaluate these factors to find your ideal mix. A balanced approach often works best. Test and measure results to refine your strategy.
Frequently Asked Questions
Is Social Media Better Than Email Marketing?
Both social media and email marketing have unique advantages. Social media offers broader reach and engagement. Email marketing provides targeted, personalized communication. The best choice depends on your specific goals and audience. Combining both can maximize your marketing effectiveness.
What Is The Difference Between Social Marketing And Email Marketing?
Social marketing uses social media platforms to engage and interact with audiences. Email marketing involves sending targeted messages directly to subscribers’ inboxes. Social marketing focuses on building relationships and brand awareness, while email marketing aims at conversion and customer retention.
Is Email Marketing Outdated?
Email marketing is not outdated. It remains a highly effective tool for engaging customers and driving conversions. Businesses still see high ROI from email campaigns.
Is Email Marketing Still Effective?
Yes, email marketing is still effective. It offers high ROI, personalized communication, and direct customer engagement. Businesses benefit from targeted campaigns and measurable results.
Conclusion
Choosing between email marketing and social media depends on your goals and audience. Email marketing offers personalized communication. Social media provides broad reach and engagement. Both strategies have unique benefits. Combine them for a powerful marketing approach. Analyze your metrics to optimize and refine your efforts for the best results.
Choosing between email marketing and social media marketing depends on your goals. Email marketing offers direct communication and personalization. Social media marketing enhances engagement and brand awareness. Both have unique strengths. Combining both strategies can maximize your reach and effectiveness.
Evaluate your audience and objectives to make the best choice.


